Drawing clothes is much easier to accomplish than one might think. Even for a complete beginner! In reality, it is not necessary to draw hundreds of folds to make a clothing drawing believable.
We set aside complexity and focus on the essentials. And since our approach to drawing will always aim to make you more efficient, today we will concentrate on sim-pli-ci-ty. 🚀
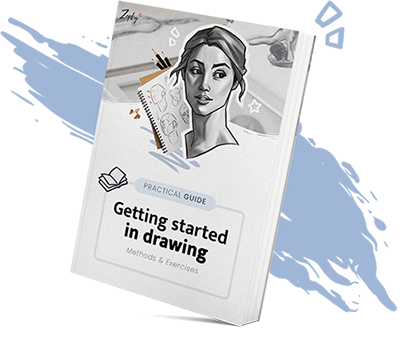
Discover our free guide to learn drawing for beginners. You’ll get practical methods and exercises you can apply right away.
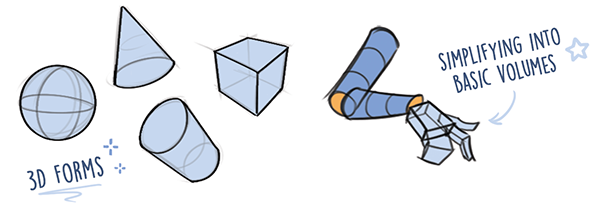
It is crucial to understand that in drawing, our goal is primarily to represent volumes. We aim to create an illusion of depth by drawing 3D elements on a 2D surface.
An arm is a volume that can be simplified, for example, into a cylinder. Ultimately, a table is an assembly of cubic blocks. Each element can be broken down into a very basic volume.
Simplifying what we see into basic volumes makes drawing less intimidating and more solid. We understand what we are drawing rather than just copying the outlines of what we see.
Soft volume / Hard volume
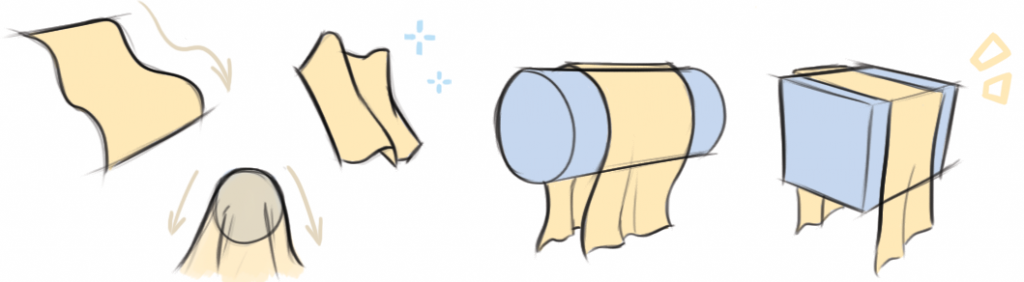
Clothing follows the same rule. It is also a volume that has thickness. But the difference is that it is soft! We can compare it to water. It is fluid and adapts to the shape it is on. It’s like it’s flowing over it.
If clothing seems difficult to draw, it’s because its folds appear chaotic. By understanding how the fabric can deform, we will be able to draw any type of cloth much more easily.
Simplified contours
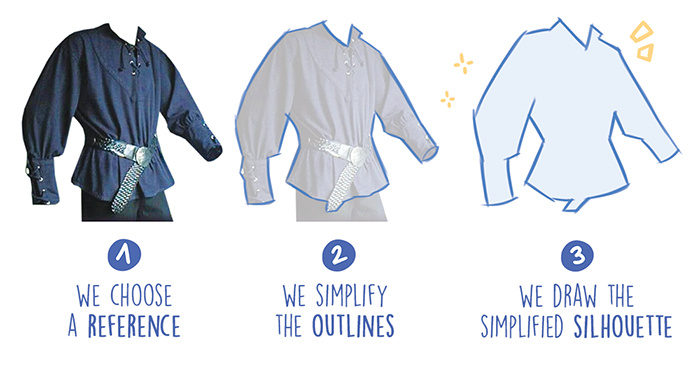
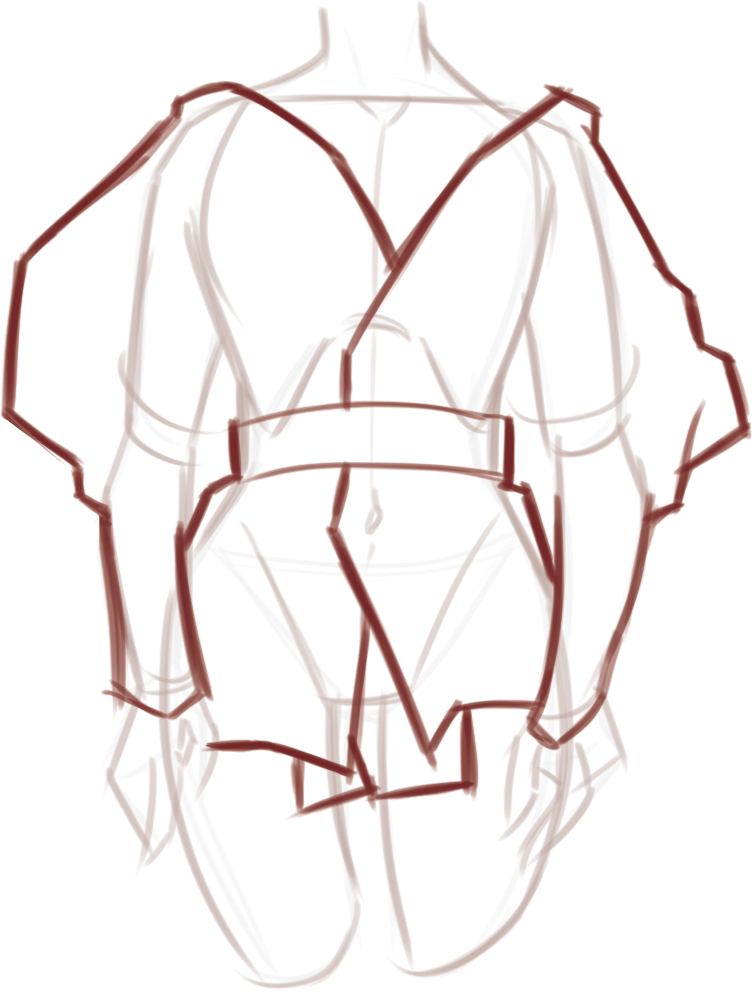
While clothing may appear complex with all these folds, we can easily simplify its contours. Start by drawing the overall shape of the cloth, as if you’re only seeing its silhouette.
By setting aside all the folds within the shape, it allows us to first work on our proportions. And most importantly, we forget about all the details to focus on the essentials.
2 - The three fundamental elements of clothing
Three essential characteristics will allow us to simplify the cloth. This will enable us to reproduce it from a reference photo and even draw it from imagination.
1
The type of volume beneath the cloth
As we’ve seen, the cloth naturally conforms to a shape, unless it’s crumpled up on the floor. But when it’s worn, it wraps around a part of the body, and therefore a volume. Therefore, the first step is always to draw what is beneath the garment.
2
The nature of the fabric
The fabric that makes up the garment will also impact its shape and how it behaves when worn.
A thick fabric will be more rigid and create more angular shapes. A thin fabric will be lighter and therefore create more curves.
3
The force exerted on the garment
The garment will behave completely differently depending on the movement of the character. The same pair of pants will have different folds depending on the weight, gravity, and movement applied to it.
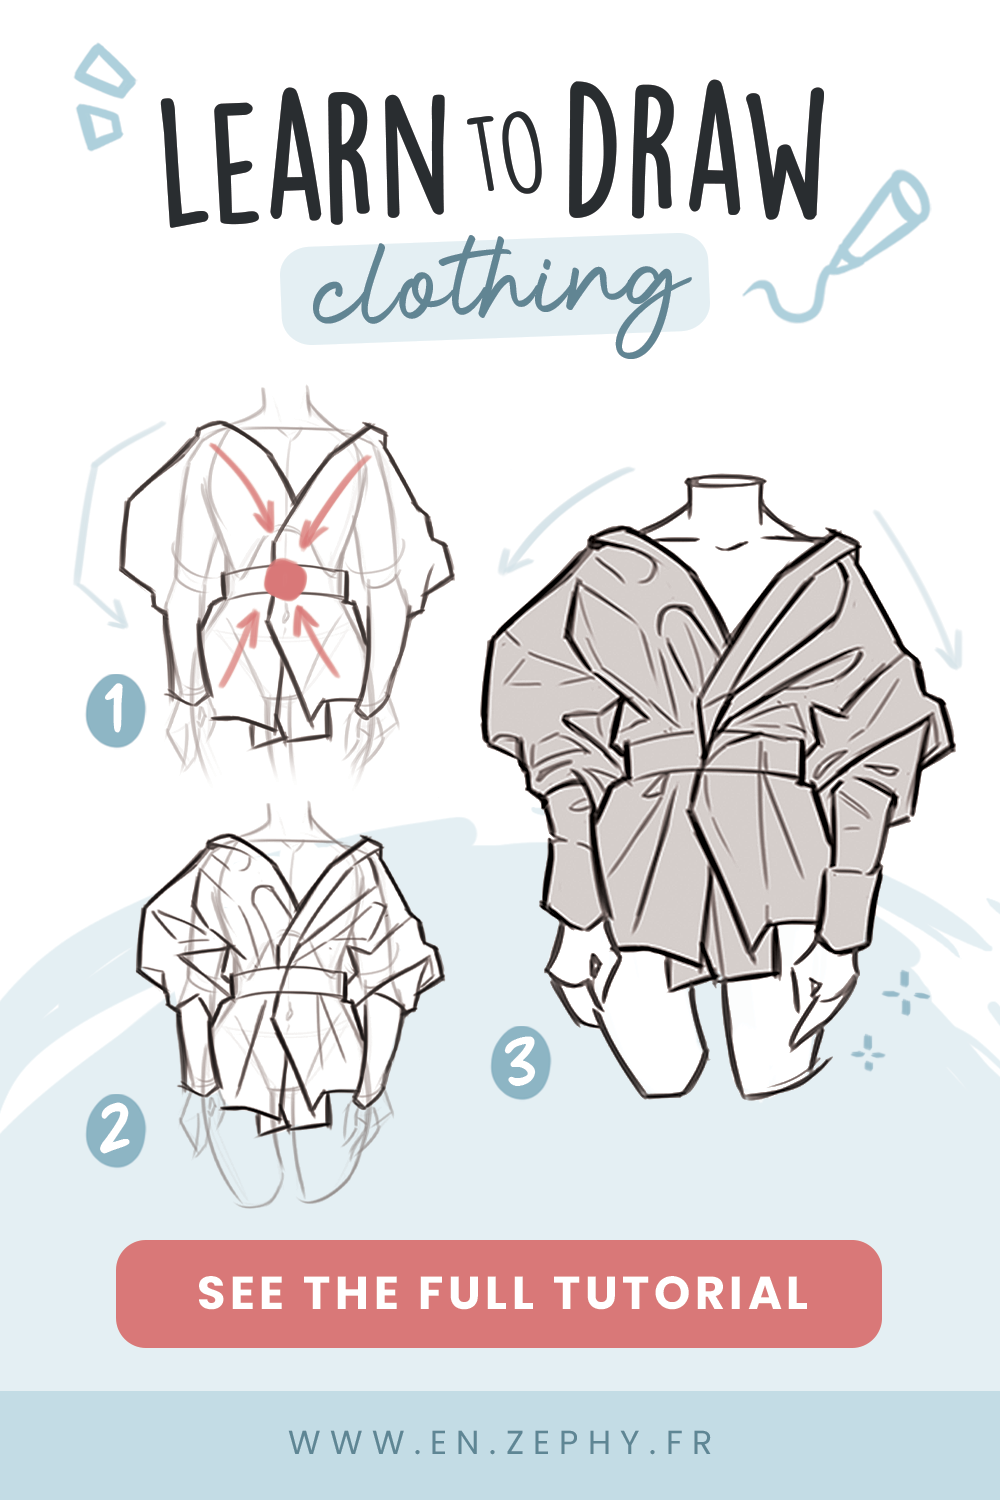
We can follow a very simple process that is easy to remember. We start by drawing our character, then we define the silhouette of the garment (with simplified outlines), and finally, we sculpt the folds within.
3 - Folds: the principle of tension and compression
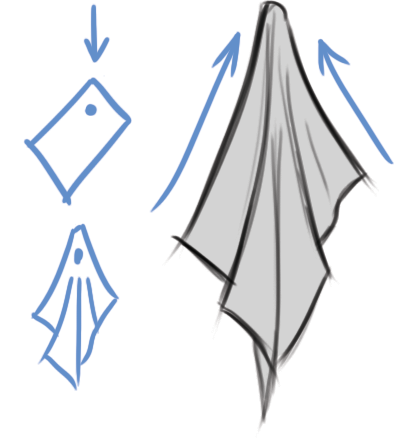
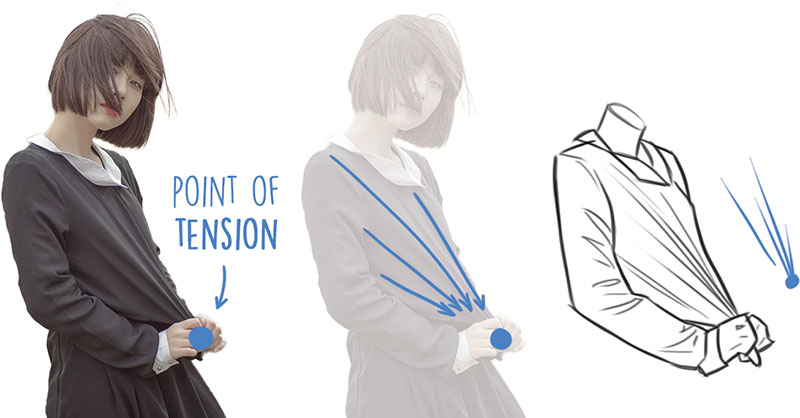
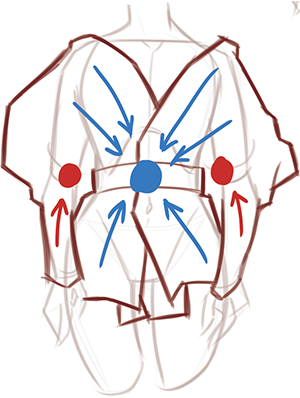
Points of tension
A point of tension is a force that goes against gravity. By hanging a fabric against a wall, we naturally prevent it from falling. We create a point of tension where it is suspended.
1 point of tension
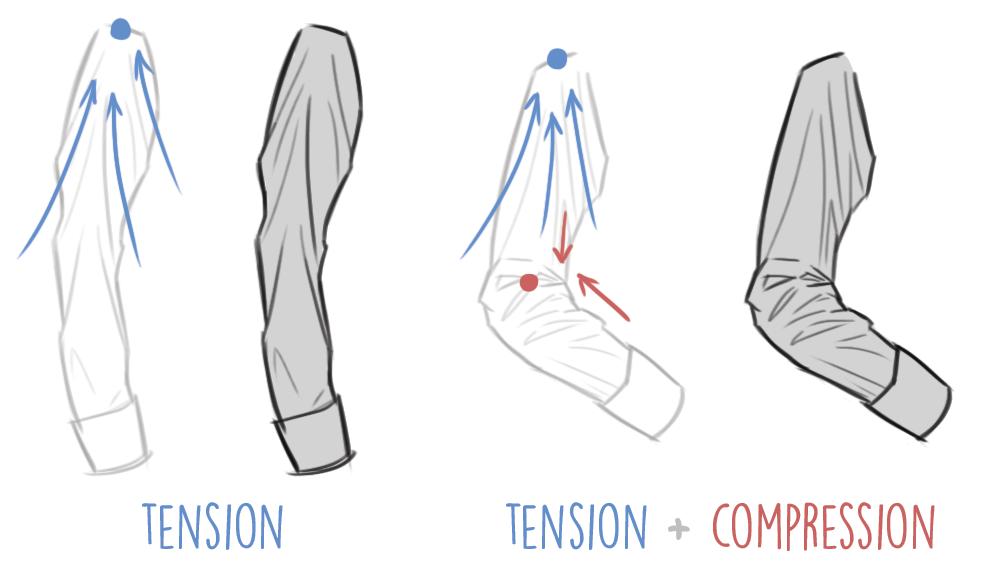
When a fabric is held by a point of tension, we can see subtle folds radiating from that point.
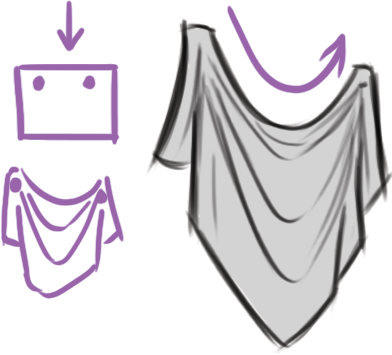
2 points of tension
When there is a second point of tension, the fabric between the two points will naturally fall.
Identifying the points of tension allows us to more easily position the main folds on our clothing drawing.
The points of compression
Once the points of tension are identified, we can then locate the points of compression. 🔍
The principle of compression is very simple: when we bend our arm, the fabric of our clothing will compress at the elbow. This naturally creates an excess of fabric and thus forms an accumulation of folds.
When fabric is compressed on one side, it will inevitably be stretched on the other. The compressed side will have folds, while the stretched side will appear smooth.
4 - Simplify the folds into basic shapes
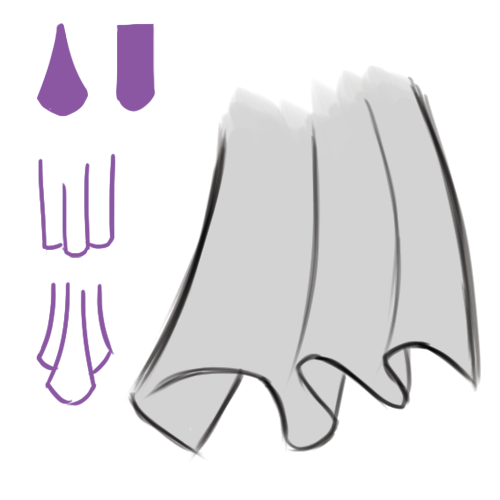
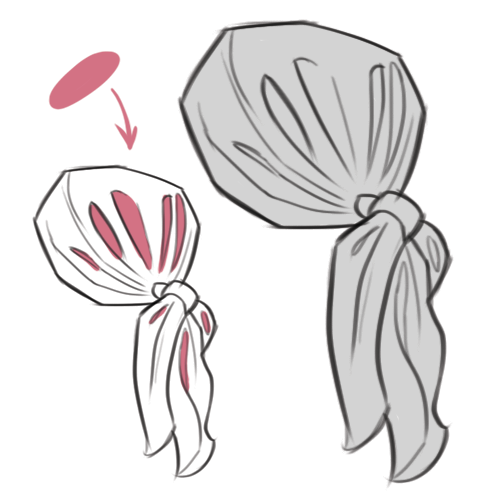
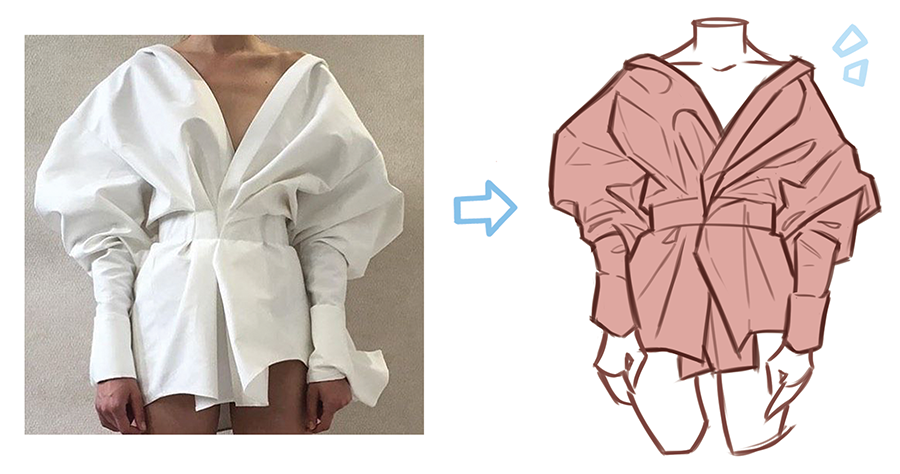
Instead of copying the exact folds of a garment in a photo, we will simplify what we see into 5 different types of folds. The idea is that instead of drawing what we see, we draw what we understand.
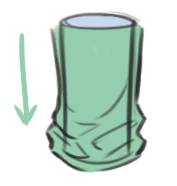
The ^ or | | folds
The fabric takes on a conical or cylindrical shape. This is a fold that is often seen at the bottom of loose-fitting garments such as skirts.
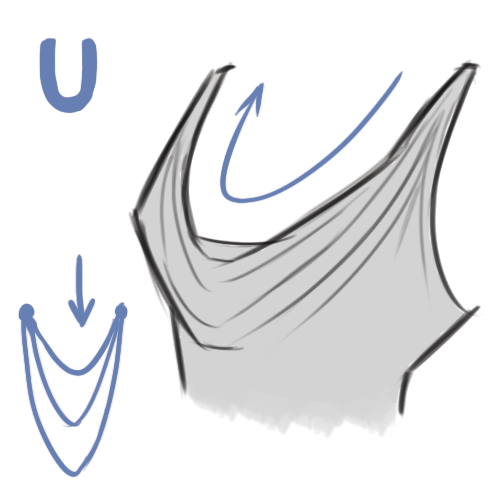
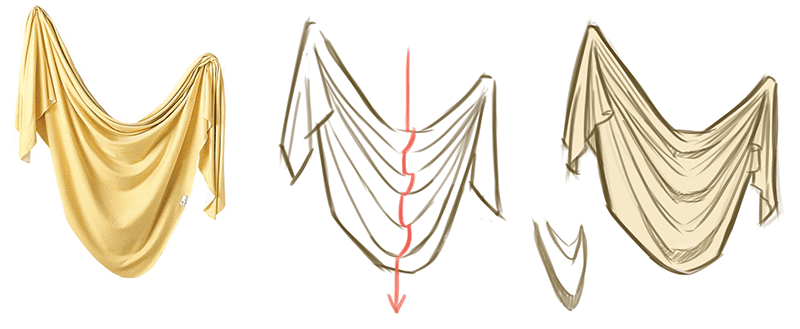
The U folds
This is a shape generated by two points of tension. The fabric falls due to gravity, as if it were suspended.
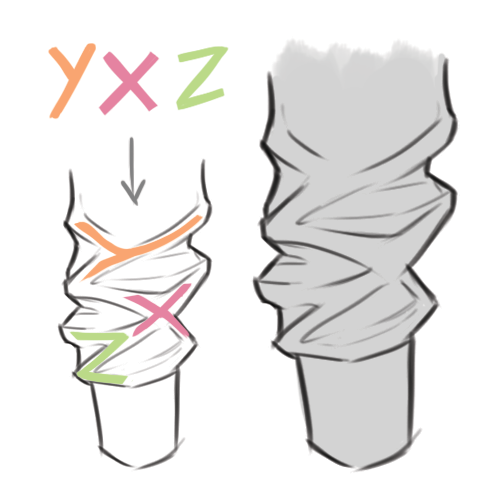
The X, Y, Z folds
When the fabric is compressed, it forms zig-zag-like shapes. By observing the relief, we can see these forms being created.
The 0 folds
These are hollows generated by the compression of the fabric. It’s as if there are crevices within the folds.
The Δ folds
The hollows can also take the form of triangles. This makes the drawing both believable and solid.
Always start by addressing the most important and visible folds, and then create a few secondary folds in simplified shapes.
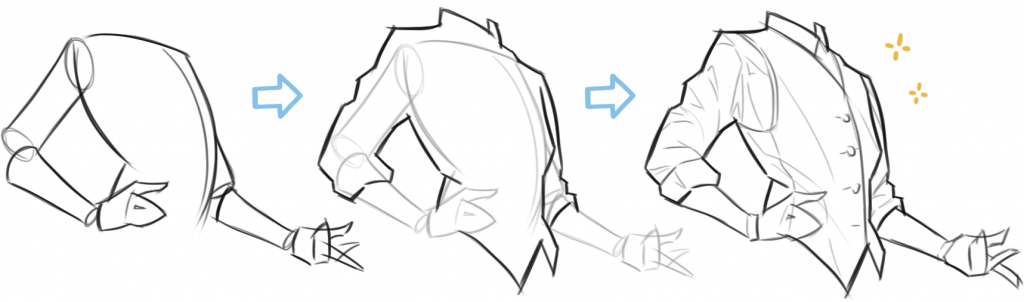
5 - The process to follow
The process we’re going to apply for drawing is very simple. We always start with the largest shape and then work on the details. We begin with the silhouette and finish with the folds.
1
The volume
As the garment conforms to the volume it is on, we first define our character or the object the garment is placed on.
2
The silhouette of the garment
Next, we define the silhouette of the garment using highly simplified lines. The goal is to have a basic shape with the correct proportions.
3
Tension & compression
Next, we identify the main points of tension and compression to understand where we can draw our folds.
4
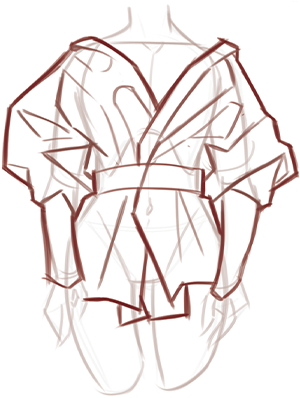
The main folds
We position the main folds while thinking in 3D. The goal is to emphasize the contours created by the garment in a simplified manner.
5
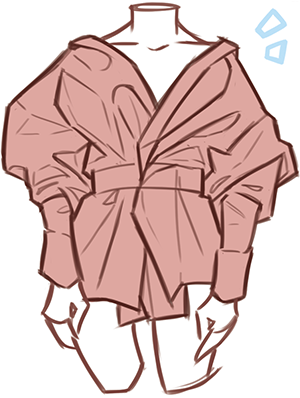
The secondary folds
And finally, we can define our secondary folds to add variety and detail. We break our outline to play with the volumes of the folds.
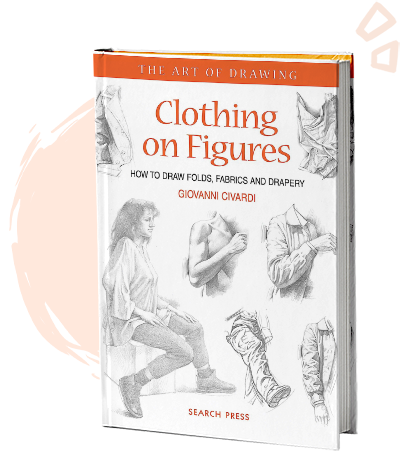
In this book, Giovanni Civardi shares his expert advice on how to draw clothing on human figures exploring lighting, perspective and the composition of fabric on the human body.
To summarize
Drawing clothing requires practice but can become very enjoyable through simplified shapes. Never forget that simplicity is the most effective method in drawing, even when aiming for realism!
When drawing clothing, start by identifying the points of tension and compression. This will make it much easier to position the folds accordingly. And by simplifying the shape of these folds, you will achieve a more effective design.
Remember that the most important thing is to approach your drawing step by step, to avoid getting overwhelmed or discouraged.
By breaking down our drawing into steps, you will realize that drawing is well within your reach, and yes, you are capable of drawing any complex shape!
Save the article for future reference!
By hovering over the image, you can directly save the article to your Pinterest account. This also allows us to share the article with a wider audience of aspiring artists!
Thanks Zephy,
I always struggle a lot with clothing folds, despite looking at various websites, tutorials, and more.
I will try your approach, which seems logical, but I need to make an effort to follow it and not rush directly without understanding the different types of folds based on compression points, tension, material, etc…
Best regards,
Hello Fabrice, you’re welcome! I hope this approach will give you the keys to progress more confidently, step by step. Taking the time to understand and observe is crucial, as it makes drawing much more intuitive. Happy drawing to you! 😊
Hi Zephy i always thought that drawing clothes was difficult ,( and it was) so thank you so much this really helps me .
Claudia, a very grateful student .
Hello, Zephy.
My name is Jason and, in honour of the fifth anniversary of the Notre Dame fire, I have decided to take on your free course in one evening.
Your methods have helped me improve my artwork. I have learned most of this in college but I truly need refreshers every once in a while.
And that was just last month. And now, I am here to learn even more from your blog posts. I am sorry that I can not afford your paid courses but, I am happy to promote your work whenever possible.
Especially, when it comes to tackling some of my weak points. Like fabric. Thank you for helping me improve my art, one step at a time.
Hey Jason, thanks so much for your feedback! I’m really glad you’re enjoying the content and that it’s helping you improve. It’s always so nice to hear that the articles are giving you ways to improve and keeping you motivated to keep practicing. And I’m really happy that the free course is useful too! Thanks again, and talk soon.
I absolutely loved this post! The ZEPHY method seems like a game changer for simplifying clothing design. I can’t wait to try it out and see how it improves my sketches. Thanks for sharing such valuable insight!
To provide the best experiences, we use technologies such as cookies to store and/or access information on devices. Consenting to these technologies will allow us to process data such as browsing behavior or unique IDs on this site. Not consenting or withdrawing consent may have a negative impact on certain features and functions.
Functional
Always active
Storage or technical access is strictly necessary for the legitimate interest of enabling the use of a specific service explicitly requested by the subscriber or user, or for the sole purpose of transmitting a communication over an electronic communications network.
Preferences
The technical storage or access is necessary for the legitimate purpose of storing preferences that are not requested by the subscriber or user.
Statistics
The technical storage or access that is used exclusively for statistical purposes.Storage or technical access that is used exclusively for anonymous statistical purposes. In the absence of a subpoena, voluntary compliance by your Internet service provider, or additional records from a third party, the information stored or accessed for this sole purpose generally cannot be used to identify you.
Marketing
Storage or technical access is necessary to create user profiles for sending advertisements or to track the user on a website or across multiple websites with similar marketing purposes.


12 comments
Thanks Zephy,
I always struggle a lot with clothing folds, despite looking at various websites, tutorials, and more.
I will try your approach, which seems logical, but I need to make an effort to follow it and not rush directly without understanding the different types of folds based on compression points, tension, material, etc…
Best regards,
Hello Fabrice, you’re welcome! I hope this approach will give you the keys to progress more confidently, step by step. Taking the time to understand and observe is crucial, as it makes drawing much more intuitive. Happy drawing to you! 😊
Thank you very much! It’s a very detailed and easily accessible way.
You’re most welcome, glad it can be helpful!
I have really seen my talent as a drawer. Thaaank you very much to you!
That’s great, happy drawing to you!
Hi Zephy i always thought that drawing clothes was difficult ,( and it was) so thank you so much this really helps me .
Claudia, a very grateful student .
Hello Claudia! I’m really glad this can help you 💪 Happy drawing to you!
Hello, Zephy.
My name is Jason and, in honour of the fifth anniversary of the Notre Dame fire, I have decided to take on your free course in one evening.
Your methods have helped me improve my artwork. I have learned most of this in college but I truly need refreshers every once in a while.
And that was just last month. And now, I am here to learn even more from your blog posts. I am sorry that I can not afford your paid courses but, I am happy to promote your work whenever possible.
Especially, when it comes to tackling some of my weak points. Like fabric. Thank you for helping me improve my art, one step at a time.
Kind Regards,
Jason Kiama.
Hey Jason, thanks so much for your feedback! I’m really glad you’re enjoying the content and that it’s helping you improve. It’s always so nice to hear that the articles are giving you ways to improve and keeping you motivated to keep practicing. And I’m really happy that the free course is useful too! Thanks again, and talk soon.
Nicely done. Very concise and smart
I absolutely loved this post! The ZEPHY method seems like a game changer for simplifying clothing design. I can’t wait to try it out and see how it improves my sketches. Thanks for sharing such valuable insight!