
Often, we forget the true challenge of drawing: capturing a moment of life on an inert surface. Drawing a human body is much more than representing a simple object. It involves grasping the emotions, the pose, the movement, the strength, the dynamism…
The human body is the most complex subject to draw because it is filled with life. It is this vitality that we must convey in our drawings.
For that, we will discover together 6 tips to draw the human body better and have more realistic characters. ✏️
Discover our free guide to start drawing easily. You will learn practical methods and exercises to put into practice right away.
1 - Capturing the Flow
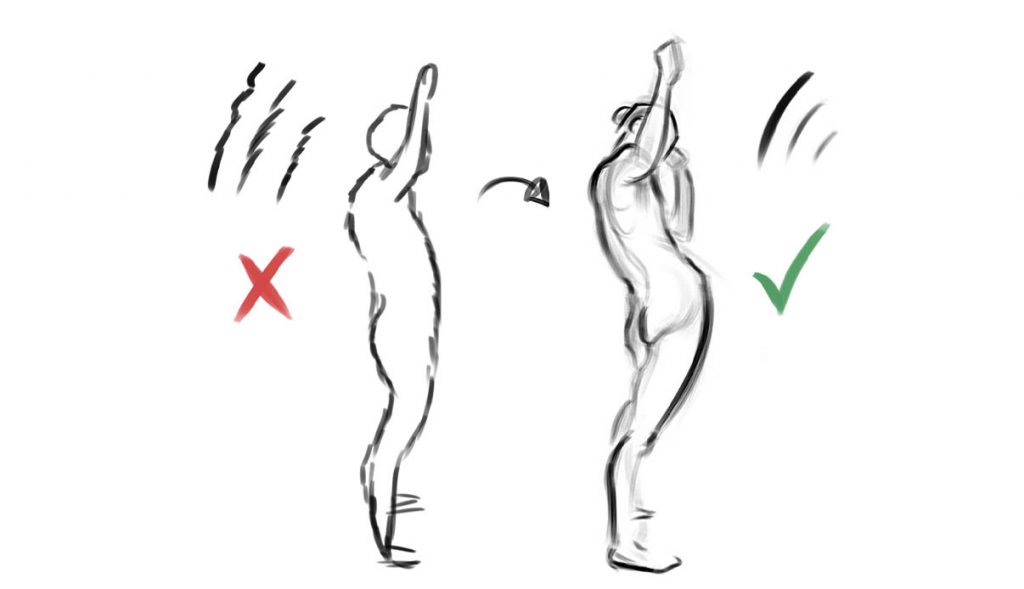
To learn how to draw a character, it is essential to first develop your gestural skills. Gesture drawing involves capturing the movement that connects various elements together.

The principle is to capture the very essence of the pose we are trying to draw, rather than simply reproducing the outlines we see.
If we draw a character starting with its outlines, we will inevitably end up with a flat, unappealing, and uninteresting drawing.

The idea is simple to understand, but we are often tempted to focus on the details and contours of the body. By reproducing what we see, we think we will get good results.
In reality, the details will be useless if we have not first captured the gesture. The gesture is like the skeleton of our character drawing.
And if we want to learn to draw our own characters, it will be necessary to learn to exaggerate the poses by starting with capturing the movement, the flow.
In a few words:
Gesture drawing involves creating quick sketches to capture the pose of a character (rather than focusing on its anatomy or details).
We use a reference for observational drawing and practice. This provides us with a point of comparison, allowing us to assess whether we captured the flow correctly or not.
We avoid drawing outlines at all costs. Instead, we focus our attention on capturing the gesture to create dynamic human body drawings.
✔️ Why Start with Gesture Drawing?
An increase in speed

The goal is to focus on the essentials and draw a pose in less than a minute. 10 minutes of drawing per day gives us 70 drawings per week. That’s a lot!
Accelerated progress

By creating a large quantity of drawings, we progress much faster. Through constant practice and repetition, we naturally achieve faster results.
A better relationship with failure

For this practice, we avoid using the eraser as much as possible. Mistakes are precisely what will help us improve in drawing! We analyze our mistakes, correct them, and then move on to the next drawing.
A developed instinct

We will naturally develop an ease in defining proportions and placing elements in the right place. Our eye-hand coordination will become effortless with practice.
A better sense of volume

We will also gain a better understanding of how the body works and moves. This will help us develop the essential foundations for drawing anatomy.
2 - Using Three Types of Strokes
The crucial element for capturing movement lies in the way we place our lines. If our strokes are rigid and shaky, we will lose any sense of fluidity. The character will appear static and lack credibility.
To add more force to our character drawings and improve our line control, it’s essential to draw very lightly. The idea is to go over the lines multiple times to thicken certain areas.
In this way, we bring depth and dynamism to our strokes. We explore this technique in detail in the article “Improving and Mastering Your Stroke”.
Drawing gesture requires being completely fluid and free in our pencil strokes.
To start, we will simplify our drawings as much as possible by using only three types of strokes: C, S, and I.
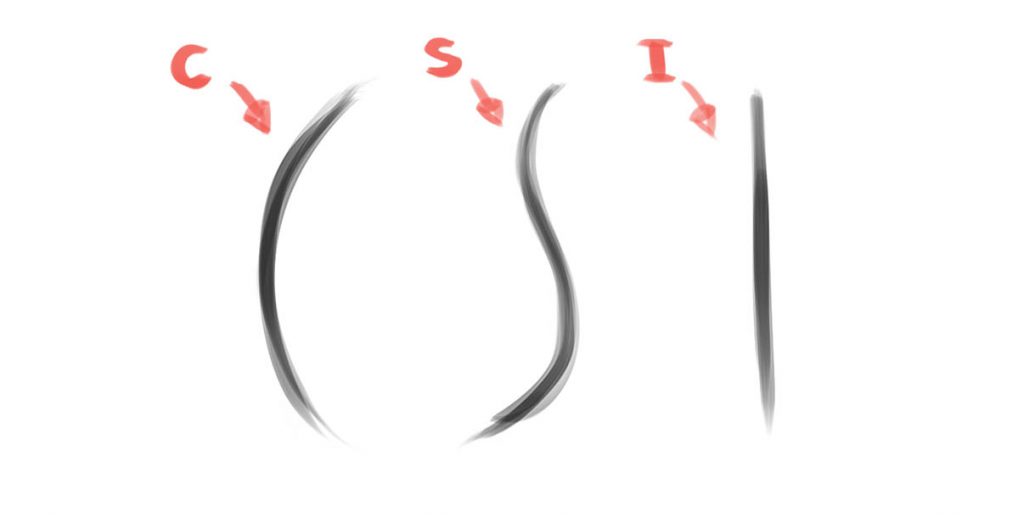

Curves convey a lot of movement and life; they are very suitable for gesture drawings.

S-shaped lines are actually a combination of two curves that we connect. They are particularly useful for drawing legs!

Straight lines are ideal for adding solidity in drawing, especially on bony parts.
These three types of strokes allow us to keep things simple and better capture the essence of the pose. If we overcomplicate our strokes, we risk adding unnecessary details and losing the overall flow.
Staying simple can be challenging; we often tend to add more strokes than necessary. Focus solely on these three types of strokes, and you will find it much easier to learn how to draw a human body.

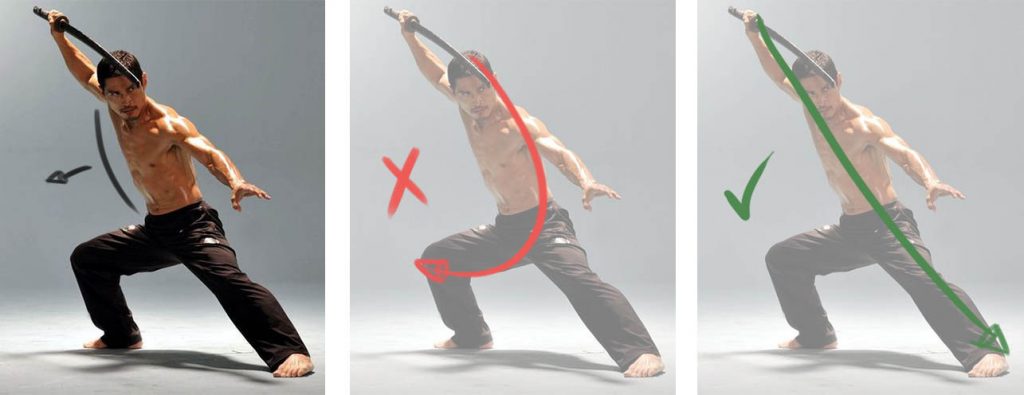
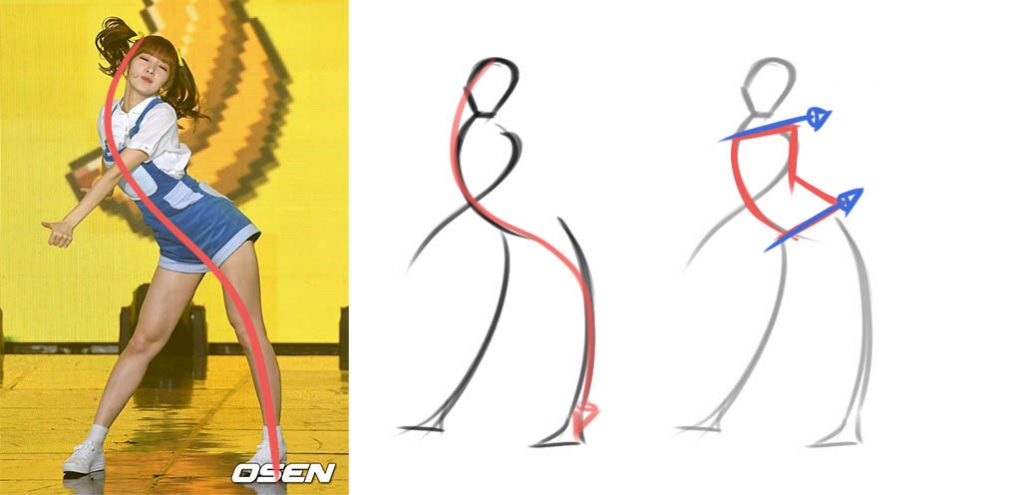
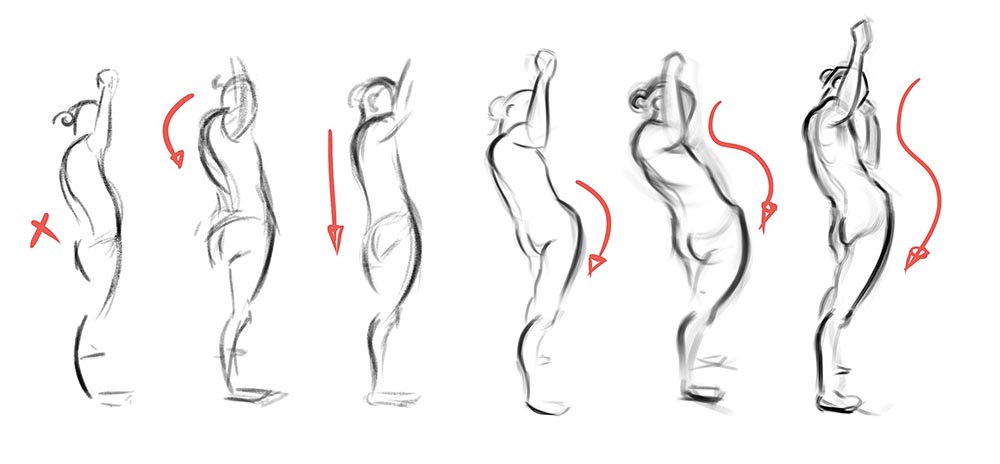
3 - Finding the Line of Action
The line of action is the longest curve that describes the movement of the character, the one we can draw in one stroke without interruption.
It defines the pose of the character and originates from the torso to give flow to the entire body.

Always take the time to carefully observe your model to find the longest uninterrupted line of the pose.
This imaginary line will help you make better choices in your strokes and better represent the character’s pose.
The trick is to always start from the front of the torso and extend this line to the arms or legs.
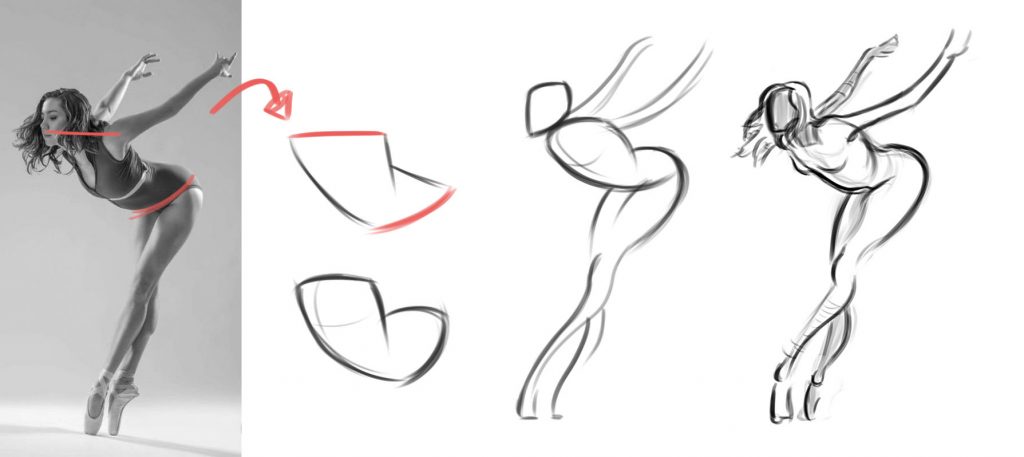
4 - Starting with the torso
The line of action originates from the character’s torso. It guides the entire body in its movement.
To better draw the torso, we’ll trace two lines to define the orientation of the shoulders and the pelvis.
Take the time to observe and analyze your model. The idea is to grasp the inclinations to draw the character more accurately.
Drawing a character is entirely within your reach! It starts by simplifying what you see into basic shapes, beginning with simple lines.
To break free from rigid and static character drawings, envision your character’s torso as a pillow made up of two parts: the ribcage and the pelvis.
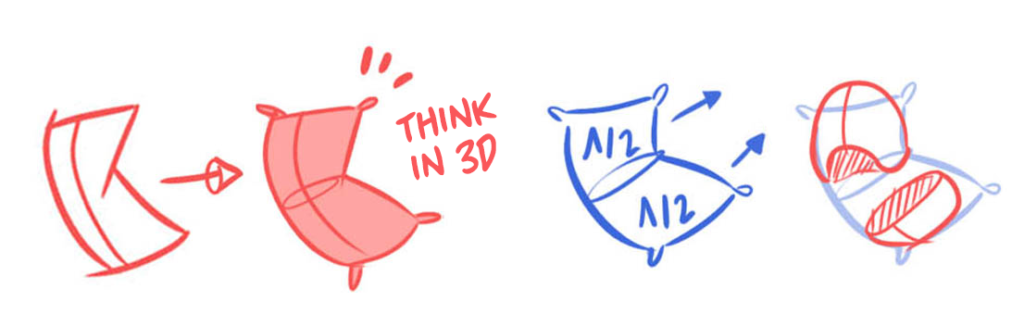
When drawing characters, challenge yourself to think in 3D as much as possible. This will enable you to enhance the body’s movement and exaggerate it. You will achieve more dynamic and lively character drawings.
To summarize
1
Observe the reference and start by establishing the orientation of the shoulders and hips.
2
Simplify the shape of the character’s torso using straight lines to represent it.
3
Consider using the pillow technique, think in 3D, and draw more curves to add volume to your character.
5 - Exaggerating the pose
The gesture should represent the character’s action. What is the character doing or about to do? Is the character angry, happy, or sad? In just a few strokes, we must immediately understand what the character is up to.
Exaggerating the pose of the model we study will allow us to tell a better story. It will make our character drawings more dynamic and interesting.
Here, we focus more on conveying movement and emotion rather than purely anatomical details. We keep the lines simple, with a primary focus on the movement of the torso.
The trick is to mimic the model’s pose to immerse ourselves better in the scene. By feeling where the muscle forces are exerted, we can enhance the pose effectively!
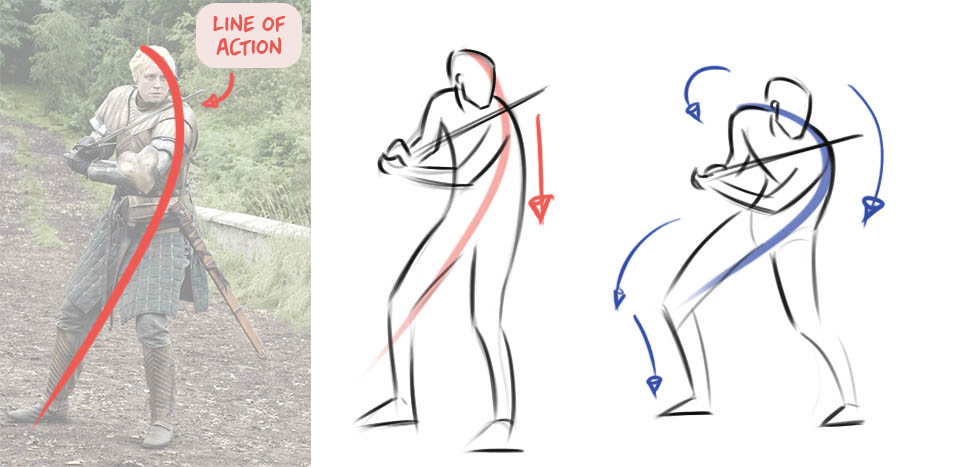
Here, for example, we have curved the line of action to amplify the message. The character appears heavier, as if ready to fight!
However, in the photo, the line of action is much less curved. Exaggerating the pose allows us to better depict the character’s action.
Moreover, it helps us practice drawing on our own, without simply copying. We use our references more intelligently to make them our own.
Take the time to draw your reference multiple times and make corrections each time you notice errors. This will allow you to exaggerate the pose, emphasize the movement, and progress much faster.
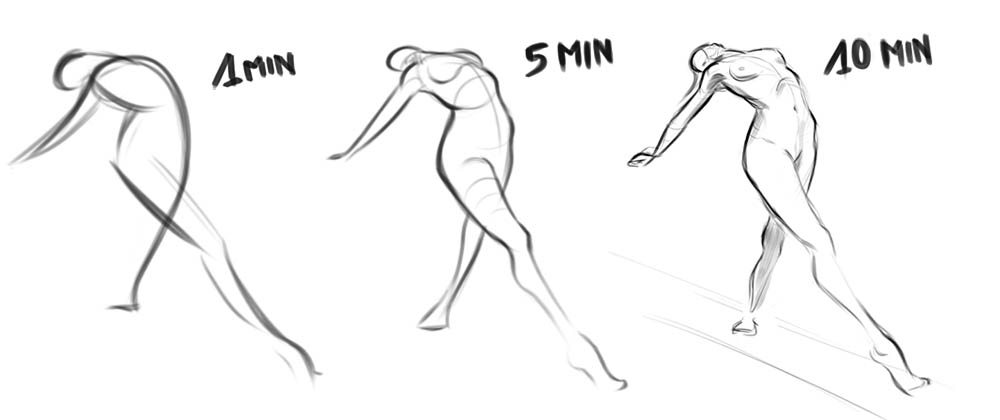
6 - Doing Quick Sketches
To learn how to draw a human body in motion, it can be highly beneficial to challenge ourselves by drawing poses quickly. This forces us to focus on the essentials, without getting bogged down in details.
You can start by practicing one-minute gesture drawings. In just 20 minutes, you’ll have 20 sketches of characters, which is quite remarkable.
One-minute poses are more than enough to capture movement and hone your sense of proportions. The more time you take, the more detail you can add.
Begin by practicing gesture drawing in one minute, then experiment with reducing or extending the time as you see fit.
The resources to help you
The most renowned website to practice quick sketches is Line of Action. It allows you to select the types of photos you want to draw and set the duration for each drawing, ranging from 30 seconds to 10 minutes.
Quickposes website can also serve as an online support for your quick sketch sessions. You simply have to choose the desired model type, time interval, and you’re all set!
Sketchdaily allows you to further enhance your sessions by also letting you choose the type of view (front, profile, low angle, etc.).
On the software side, Gesture drawing! provides you with the option to choose photos directly saved on your computer. You can set up different types of sessions (practice, relaxation, etc.) and even customize the break times, which is quite convenient.

Our must-have drawing books
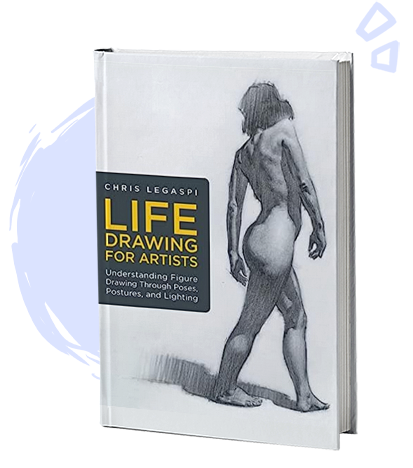
Chris Legaspi is an artist we greatly admire and draw inspiration from! He brilliantly simplifies the approach to the human body by addressing gesture with ease.
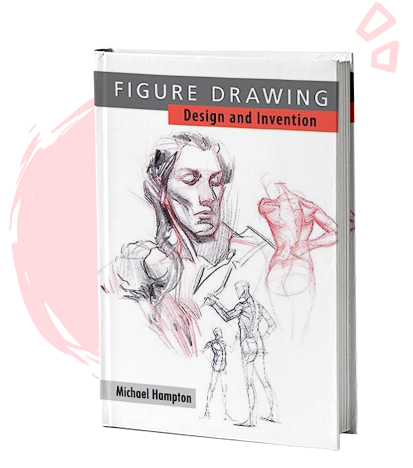
The quality of this book is beyond doubt. Hampton approaches the human body with simplicity and accuracy, infusing his creations with a lot of life and volume.
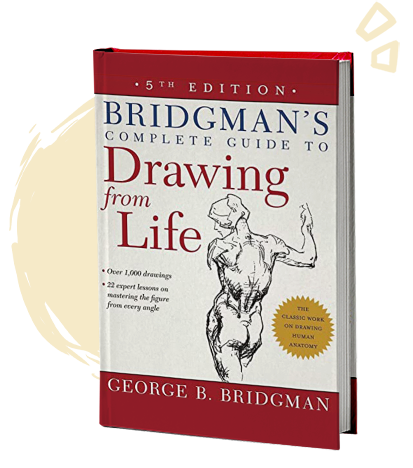
Bridgman’s book is an essential addition to your collection, featuring in-depth lessons and over 1000 drawings, breaking down the human body.
To summarize
We have covered the 6 tips to learn how to draw a human body or a character:
- 1 – Drawing movement
- 2 – Using three types of lines (C, S, I)
- 3 – Finding the line of action
- 4 – Starting with the torso
- 5 – Exaggerating the pose
- 6 – Doing quick sketches
Movement is essential to add dynamism to your drawing. It is as crucial a skill as knowing how to draw anatomy!
Starting with learning to draw gestures allows us to progress in drawing and better understand the anatomy of the human body in general.
Spending 10 minutes a day practicing drawing poses is highly productive. It helps us learn to draw more fluidly and freely without spending 5 hours on a single drawing. ✍️

Save the article for future reference!
By hovering over the image, you can directly save the article to your Pinterest account. This also allows us to share the article with a wider audience of aspiring artists!
15 comments
It’s amazing how much it changes the movement; I had never realized how crucial it is!
I love the example of the pose with the sword, thank you! Can’t wait to try the exercises!
I’m thrilled that it’s helpful for you! Movement can definitely make a difference. 😀
Happy drawing! ✏️
Your tutorials are great! Thank you!
You’re so welcome ! Thank YOU for your kind comment. I’ll make an english version of all the tutos in coming months ✨
Many tips. A formula invented to find the dynamism of the human body. Fantastic!
Hello Zephy, I was wondering if there would be a “part 2” with more exercises. In any case, a big THANK YOU because it was helpful (:
Hello Sawtynea! Yes, the sequel is planned. We will address proportions to delve into more detailed cases ✨
I’m thrilled that it could be helpful! I’ll send a little email when the next article on the human body is released. 😊
Very interesting perspective and dynamic approach!
Thank you
JCP
Thank you so much, Jean! I’m delighted that you like it! ✨
You’re reinventing the approach to drawing! Thank you for these tips that bring us back to the essentials!
It’s with great pleasure, thank you for this lovely feedback! ✨
Your painting logic helped me a lot, as well as the mentality about painting, which made me feel that painting is not so hard, thank you very much. Also, can you give me some tips on how to draw expressions? I’m looking forward to the instructional video with subtitles to be made soon haha.
I’m so glad it helped you! Everything can be simple when broken down into steps. Hard to master, but simple to understand 😊 I’ll do a full tuto about expressions, it could be fun to explore that. I’ll let you know about the english course, thank you!
Thank you very much for this article, it helped me understand my blockage when I draw the human body.
You’re welcome, glad I could help you! ✨