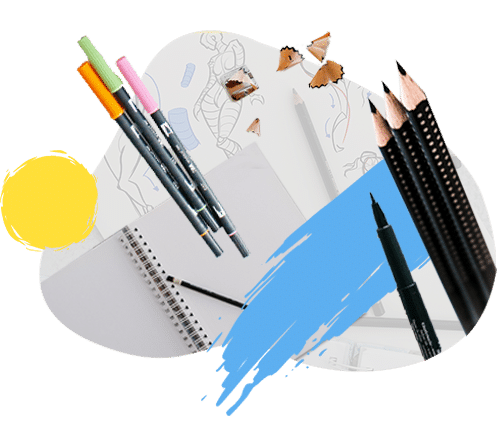
When we start drawing, we are often lost when it comes to the materials to use. What are the essential tools we need to learn effectively? Are there any indispensable items to get?
We tend to believe that having a multitude of tools is necessary to start drawing. In reality, that’s not the case! You will see that with the right materials, you will be perfectly comfortable to begin your learning journey.
Some tools may be trivial, while others are truly useful for improving your drawing skills. We will go through them one by one so that you can equip yourself in the best way possible.
Discover our free guide to start drawing easily. You will learn practical methods and exercises to put into practice right away.
We will cover the essential and most well-known tool in drawing: the pencil. There are several types of pencils with different thicknesses and hardness levels. Graphite pencils are very accessible and allow for a beautiful range of intensity, from dark black to light grey.
The pencil scaling
Pencils are all graded on a scale ranging from 9H to 9B. So, what does that mean in concrete terms?
The letter ‘H’ stands for ‘Hard’ and represents a very dry and hard lead. A 9H pencil will make very light and barely visible lines.
The letter ‘B’, on the other hand, stands for ‘Black’ and represents a very soft and greasy lead. A 9B pencil will make very dark and thick lines.
Between the H pencil and the B pencil, we find the F pencil and the HB pencil.
The pencil labeled F stands for “fine point,” and it sits in the middle of the scale between the hard and soft pencils.
The HB pencil, on the other hand, stands for “hard bold,” meaning it has a medium point. It is slightly softer than the F pencil.
When starting out, which pencil should you choose?
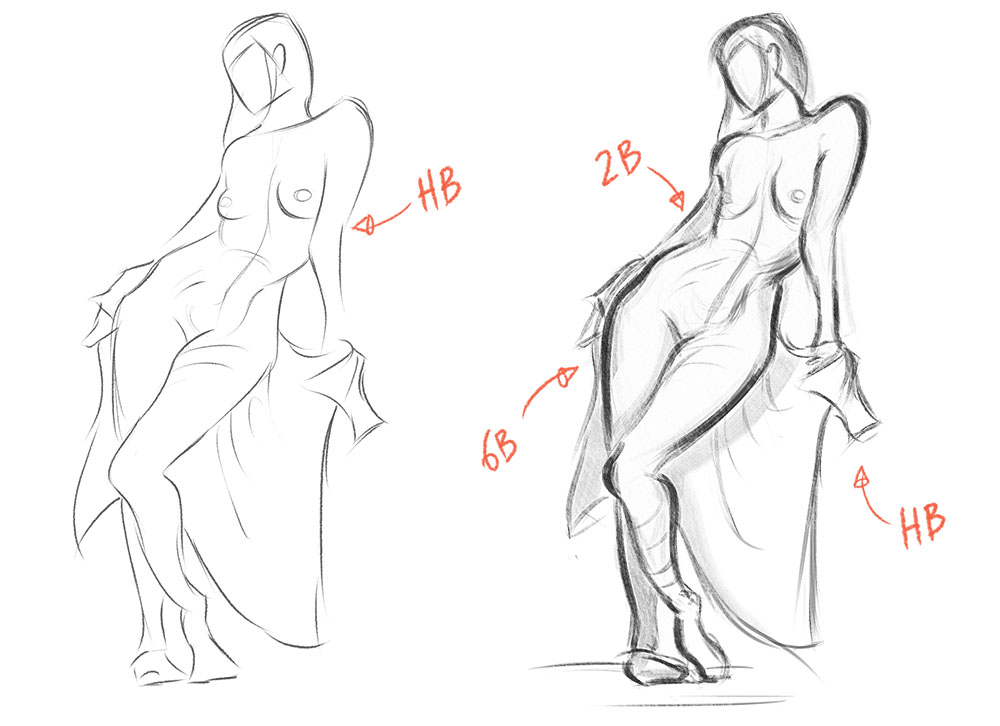
It is absolutely not necessary to have 20 pencils with different hardness levels to start drawing. The idea is to vary between a few thicknesses (three, for example) to add variety to your sketches.
By changing the thickness of your lines, we create depth in our drawings. Our sketches become better, more solid, and more believable, even as a complete beginner. It’s a simple yet very effective technique to bring our drawings to life!
Do not hesitate to take a look at the article “Improving and Mastering Your Lines”, where we specifically address the importance of varying the thickness of our lines and how to do it properly.
Generally, it is not necessary to use very fine pencils. They may come in handy for adding fine details, but an HB pencil is sufficient at this stage.
On the other hand, we can thicken the outlines of our drawings using softer, darker pencils. The key is to always start with lighter shades and gradually move towards darker ones to achieve an aesthetic and solid result.
The trick is to never press too hard with the pencil, as it may damage the paper. If the line is too light, instead of applying more pressure, simply switch to a softer pencil. The line will automatically become darker.
📌 Our recommendation
Our favorite pencils are from the Faber-Castell brand. The quality is excellent, and we haven’t found anything better in terms of quality and price. The “Art” set includes 12 pencils ranging from 2H to 8B, which is perfect for getting started with drawing.
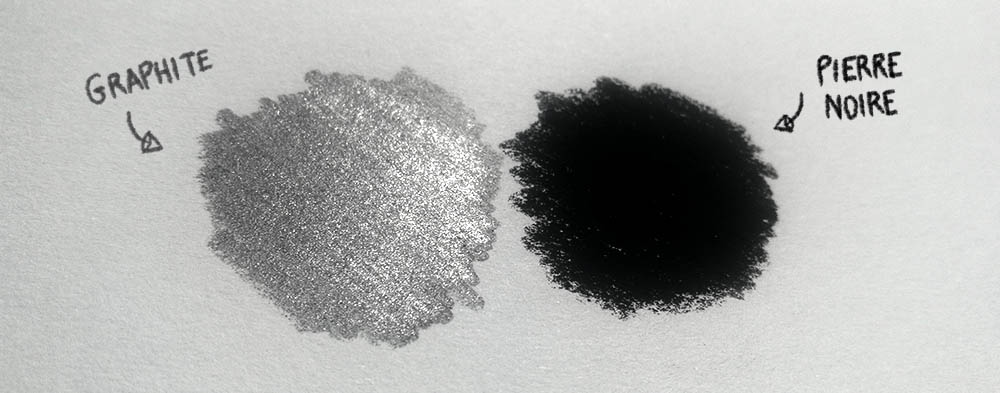
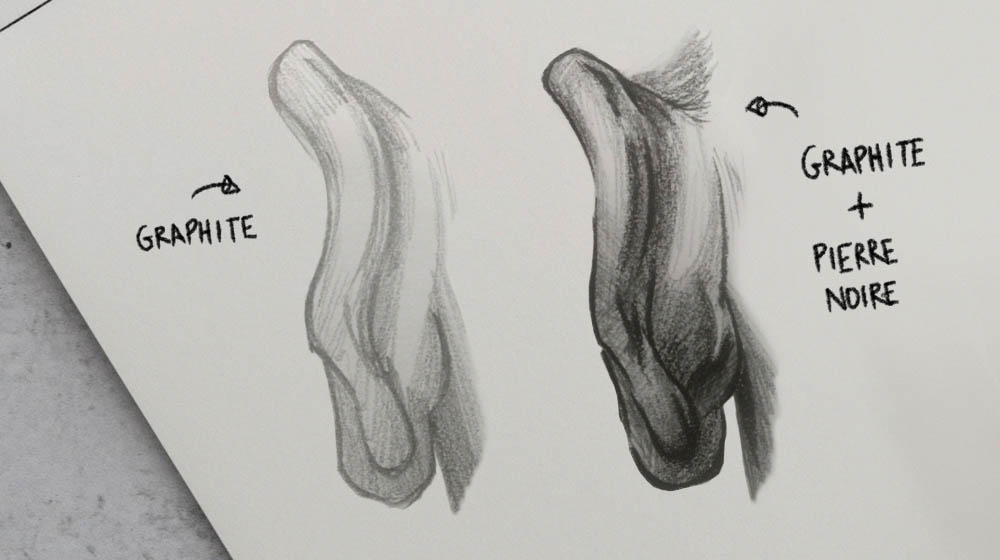
The black stone pencil, also known as “Pierre noire” in France, is a very dark and matte pencil, resembling charcoal. It comes from ampelite, which is a black-colored schist.
The black stone pencil was extensively used by the great painters of the Renaissance because it allows obtaining a flawless black. Its format is convenient, and nowadays, it is available in the form of a simple pencil.
By using the graphite pencil for shadows or on large areas, we get a silvery reflection. However, with the black stone pencil, we achieve a matte finish. The result is instantly more intense.
The black stone pencil also comes in different hardness grades. The HB grade is sufficient to achieve a beautiful black and a standard thickness.
If you want to add depth to your shadows, this black pencil is a must-have! It maximizes the intensity of the black and can give a whole new dimension to your drawings.
Drawing with the black stone pencil forces you to identify the shadow areas in your drawing and encourages you to work on your shadows more effectively.
📌 Our recommendation
The pencil we use the most comes from the Conté brand. Its lead is soft, and the quality is top-notch. It is essential for creating contrast easily. It is ideal as the final layer of a drawing, giving it character and depth.
Sometimes, it is more beneficial not to erase our drawings to improve. It’s a good exercise to become familiar with our mistakes and accept them better, but nonetheless, the eraser remains an essential tool to have!
When we start drawing, we often lack confidence and fear making mistakes. It’s entirely normal. The eraser will allow us to correct misplaced lines and help us gain confidence in our drawing skills gradually.
When choosing your eraser, it is crucial to avoid the colored ones. They can leave a messy residue on your paper and even damage it.
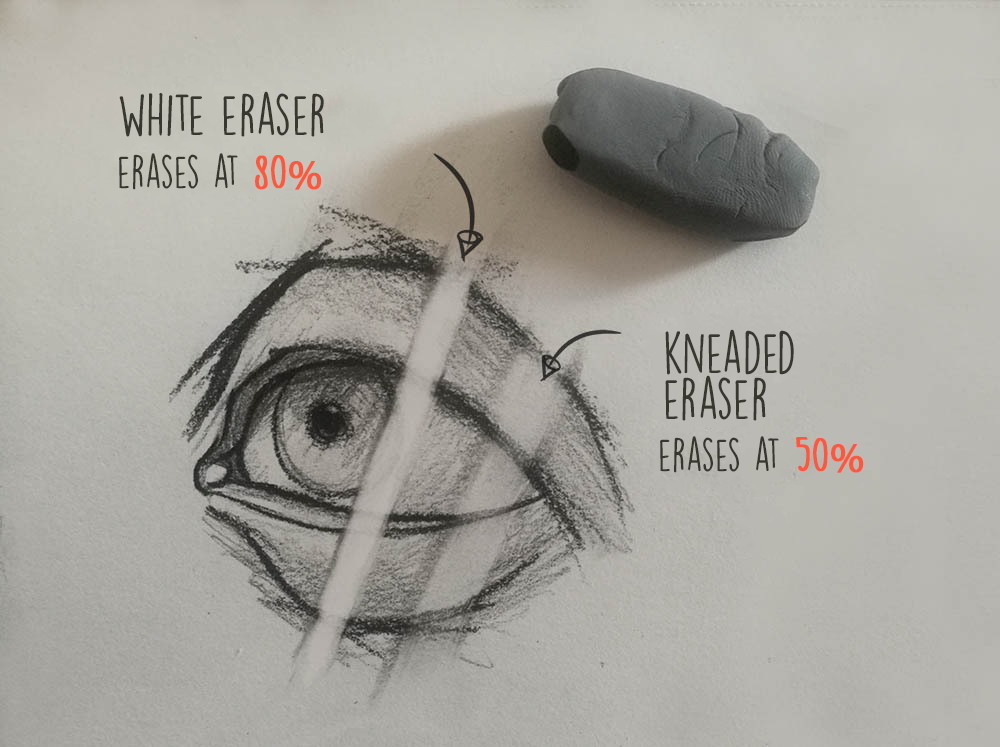
The white eraser
The white eraser is the basic tool that everyone has. It erases pencil strokes very effectively and is a must-have. However, there are more suitable options for drawing and frequent use!
📌 Our recommendation
Staedtler erasers are a quality reference for drawing. The brand offers erasers of very good quality—simple, effective, and long-lasting without wearing out easily.
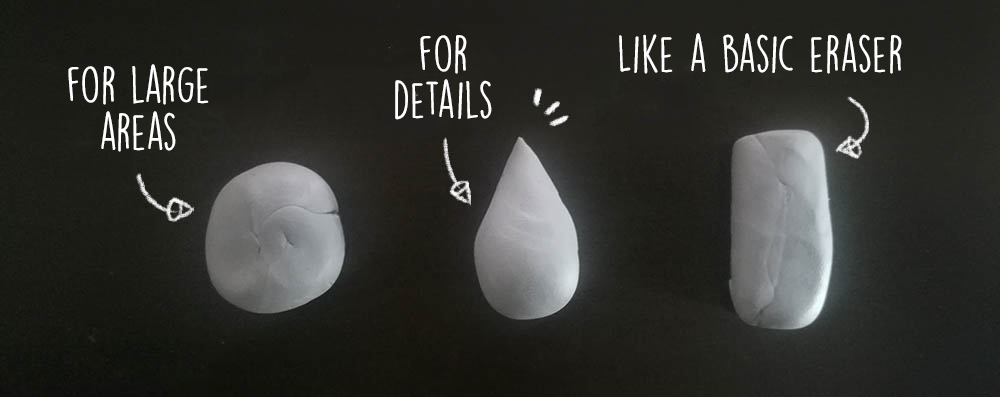
The kneaded eraser is a very interesting complement to the white eraser. It is absorbent and very malleable, similar to modeling clay. We can shape it into a fine point to erase very small lines or roll it into a ball to erase large areas. It’s a versatile and handy tool to have in our drawing kit.
To clean this eraser, simply stretch it in all directions to mix the pencil pigments. It’s super convenient!
However, keep in mind that its lifespan is shorter because as it mixes with the pigments, it may leave traces. The advantage is that it is inexpensive, so you can replace it regularly without any worries.
In general, when we make a mistake, we want to completely erase the lines, so we prefer to use the white eraser. But once our rough sketch is done, we can use the kneaded eraser to lightly erase the entire drawing.
This allows us to leave a faint trace to go over with a soft pencil or a pen, for example. This technique is useful for giving the effect of a finalized drawing while retaining a light trace of the initial rough sketch.
📌 Our recommendation
Our favorite is the eraser from Faber Castell, the same brand as the graphite pencils. This eraser has a quality that lives up to Faber Castell’s reputation, and it is affordable and comes with a small plastic case to keep it tidy after each use.
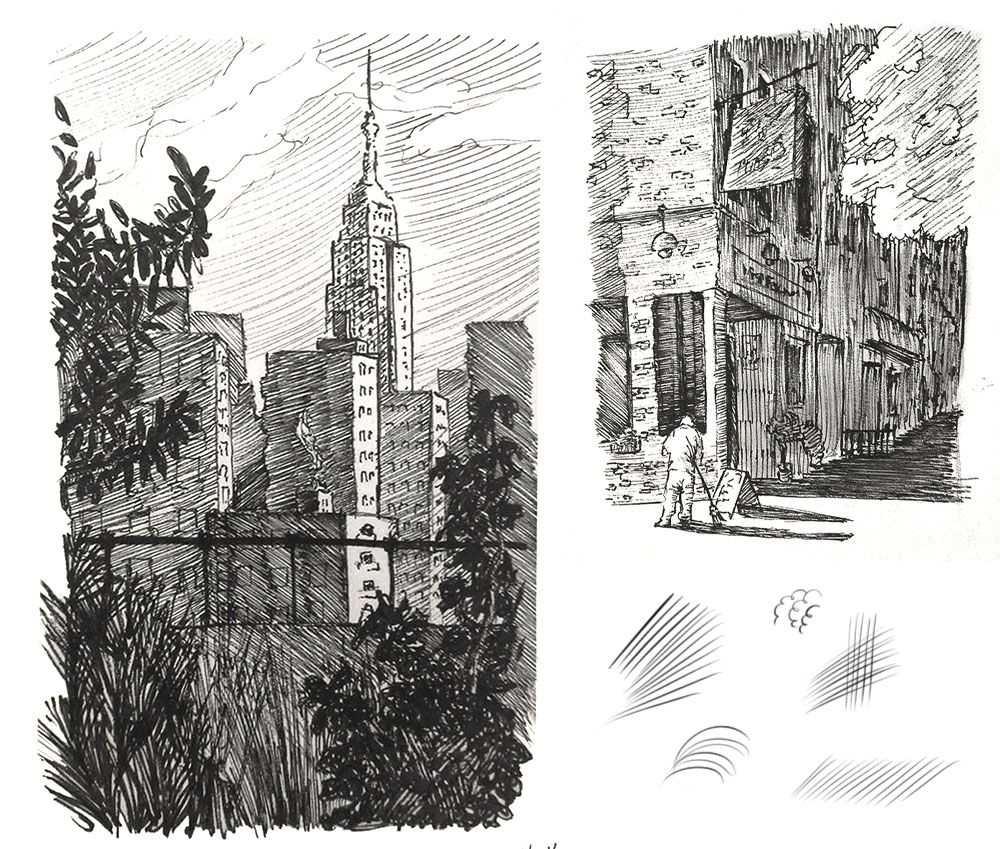
Pens are among our favorite tools and have been extremely helpful in our drawing journey. By challenging ourselves to sketch with pens, we have learned to accept and embrace our mistakes or misplaced lines.
This has allowed us to understand how to correct them, and we simply start over with the sketch. As a result, we create more practice sketches, and there’s nothing better for improving our drawing skills!
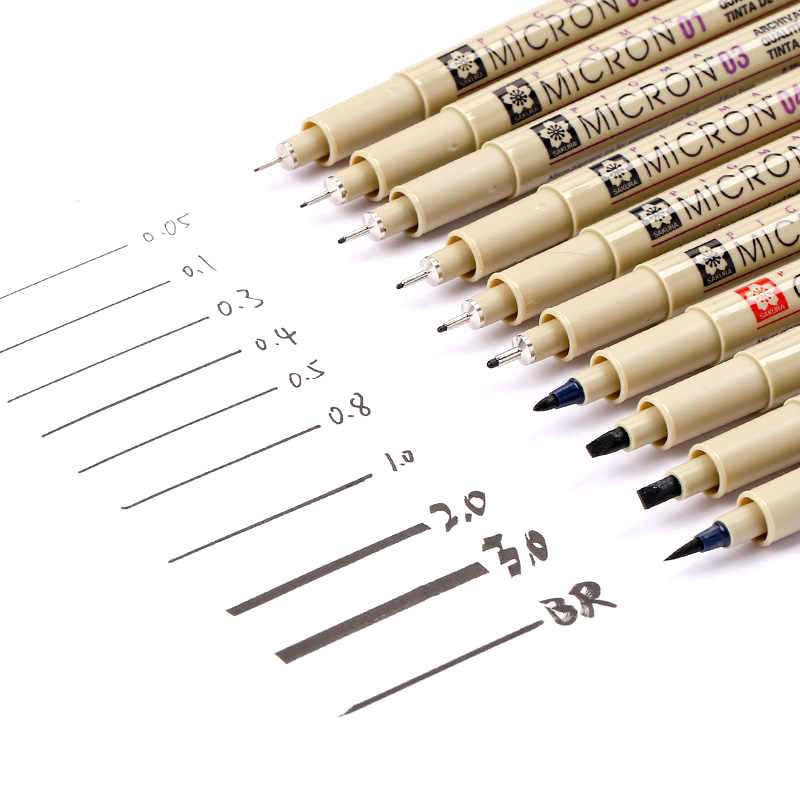
There are pens available with different tip sizes, which makes it easy for us to vary the thickness of our lines, similar to using different pencils.
The other advantage of pens is that they truly enhance the quality of our lines. Being forced to create hatches for shading, we inevitably improve our line control and mastery.
📌 Our recommendation
Our favorite pens are the Sakura Pigma Micron. The sets come with different tip sizes, ranging from 0.05mm to 3.0mm, providing a wide variety of line widths. The tips are durable, and the ink flow is perfect. A definite winner!
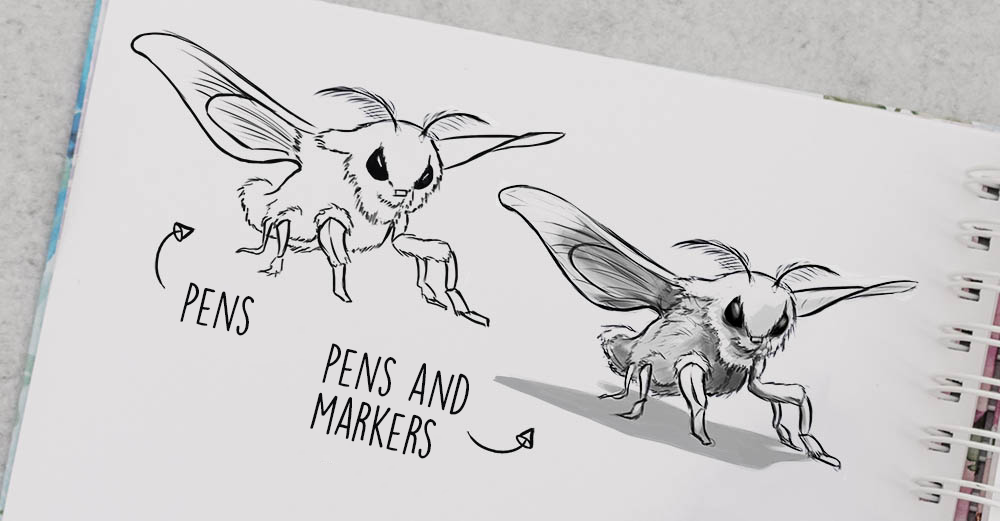
Though it may seem surprising to mention markers, they are, in our opinion, a fantastic tool for beginners in drawing. They allow us to practice better understanding of volume by easily adding shadows.
When we start drawing, facing drawings that might not meet our expectations can be discouraging. It’s easy to lose motivation.
Markers can make our lives easier by providing a beautiful result effortlessly, helping us stay encouraged and enhancing our understanding of volumes and shadows.
Using different shades of gray is perfect for creating shadows with various levels of intensity, ranging from light gray to very dark gray. The result is very appealing, and most importantly, it saves us a lot of time!
📌 Our recommendation
The Promarker by Winsor & Newton is a fantastic tool to enhance your sketches and easily add shadows. They provide excellent results, it’s perfect to get accustomed to shading.
Armed with our drawing tools, we need a good surface to lay down our strokes and begin our first drawings. In our opinion, any basic printer paper will do the job.
It is much easier to draw on a smooth and texture-free sheet to start with. This allows us to focus on the quality of our lines without being bothered by the paper’s grain.
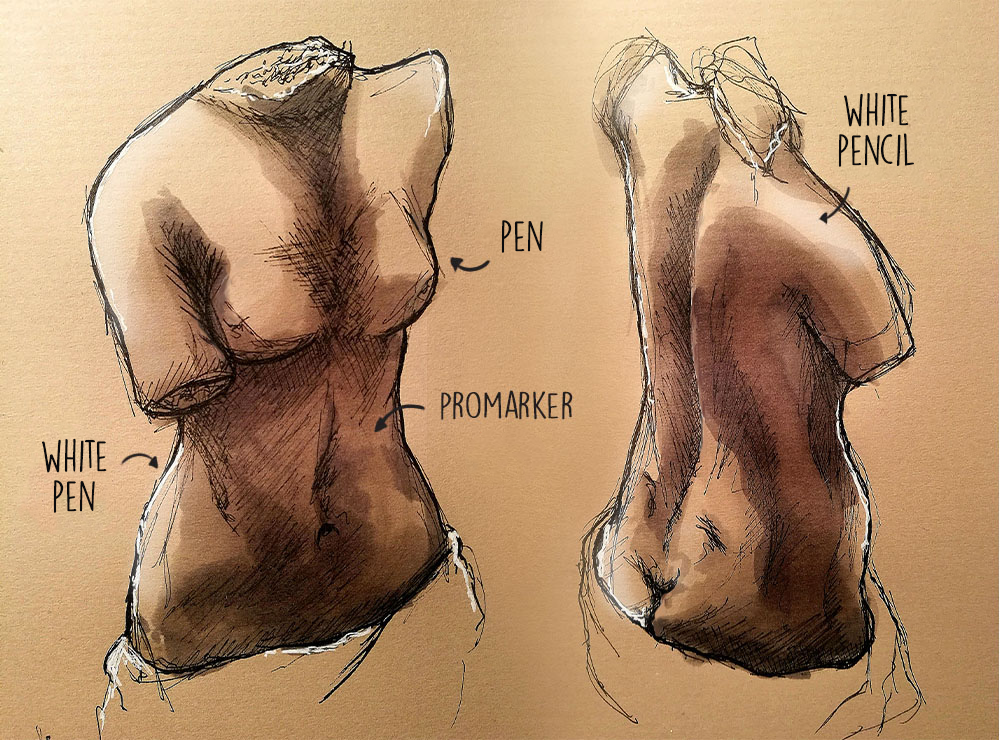
A useful tip to improve your drawing skills is to switch to kraft paper. The advantage of this paper is that it is tinted, and with the magic of a white pencil, we can work on shadows and highlights much more effectively than on white paper.
Indeed, on a white sheet, we cannot add light to our drawing; we can only add shadows. Starting on kraft paper is, therefore, ideal if we want to improve our shading skills. Our drawing will automatically gain depth and volume.
If you try using kraft paper, remember to get a white pen and pencil to add highlights effectively.
📌 Our recommendation
The most affordable and convenient kraft paper sketchbook is the one from Mtsooning. Spiral-bound sketchbooks are advantageous for practice drawings; they are ideal for warm-ups.
There’s no need to have a multitude of different pencils or an infinite variety of papers to start drawing. Let’s keep it simple and focus on what will truly help us improve.
If we find that drawing with a pen helps us better control our strokes, then let’s continue that way! The key is to experiment with a few tools to determine which ones we feel most comfortable with.
Drawing should be enjoyable, so let’s not overthink about finding the best artist’s set. The tool does not define the artist, and the only thing that matters is making progress every day. ✍️
Save the article for future reference!
By hovering over the image, you can directly save the article to your Pinterest account. This also allows us to share the article with a wider audience of aspiring artists!
Hello,
First, I just wanted to let you know that your blog is absolutely fantastic.
Thanks to you, I’ll be able to step up my drawing game even further.
I work a lot with Posca markers, and I also use Comté de Paris pencils, and of course, I agree with you on the Faber Castel pencils.
If you happen to have a little time, take a look at my Facebook or Instagram page, “Fab arts 16.”
Thank you again, and keep up the great work.
Have a wonderful day!
Fabrice
Hello Fabrice ☀️
Thank you for your kind message. It’s true that I didn’t mention Posca markers, but they are definitely fantastic to work with. We agree, Faber Castel pencils are really great. ????
I will gladly take a look at your work.
Have a wonderful day! ✨
Hello Marjane, there are several ways to color a drawing (colored pencils, markers, paint, watercolor…), and it all depends on what kind of result you want to achieve! As for me, I draw a lot digitally and also color my drawings digitally.☺️
To provide the best experiences, we use technologies such as cookies to store and/or access information on devices. Consenting to these technologies will allow us to process data such as browsing behavior or unique IDs on this site. Not consenting or withdrawing consent may have a negative impact on certain features and functions.
Functional
Always active
Storage or technical access is strictly necessary for the legitimate interest of enabling the use of a specific service explicitly requested by the subscriber or user, or for the sole purpose of transmitting a communication over an electronic communications network.
Preferences
The technical storage or access is necessary for the legitimate purpose of storing preferences that are not requested by the subscriber or user.
Statistics
The technical storage or access that is used exclusively for statistical purposes.Storage or technical access that is used exclusively for anonymous statistical purposes. In the absence of a subpoena, voluntary compliance by your Internet service provider, or additional records from a third party, the information stored or accessed for this sole purpose generally cannot be used to identify you.
Marketing
Storage or technical access is necessary to create user profiles for sending advertisements or to track the user on a website or across multiple websites with similar marketing purposes.


8 comments
Hello,
First, I just wanted to let you know that your blog is absolutely fantastic.
Thanks to you, I’ll be able to step up my drawing game even further.
I work a lot with Posca markers, and I also use Comté de Paris pencils, and of course, I agree with you on the Faber Castel pencils.
If you happen to have a little time, take a look at my Facebook or Instagram page, “Fab arts 16.”
Thank you again, and keep up the great work.
Have a wonderful day!
Fabrice
Hello Fabrice ☀️
Thank you for your kind message. It’s true that I didn’t mention Posca markers, but they are definitely fantastic to work with. We agree, Faber Castel pencils are really great. ????
I will gladly take a look at your work.
Have a wonderful day! ✨
hello,
thank you, I will try to make progress
With pleasure! Happy drawing to you ✨
thank you very much. very clear, no shadows. it’s up to us to put the pencils on the paper.
It’s a pleasure, good practice! ✏️
Hello, I would just like to know what you use to color your drawings
Hello Marjane, there are several ways to color a drawing (colored pencils, markers, paint, watercolor…), and it all depends on what kind of result you want to achieve! As for me, I draw a lot digitally and also color my drawings digitally.☺️