To draw a portrait, we are often tempted to start by learning how to draw an eye, a mouth, or details that, at first glance, seem unimportant.
We begin by focusing on the details, without even knowing where to place them on the head (or even how to draw the head itself).
In the end, we don’t really know how to learn to draw portraits in a simple and effective way. And despite all the step-by-step tutorials we follow, we don’t progress as much as we would like.
The good news is that we are going to fix this right now by focusing on the foundation: the structure of the head. 🚀
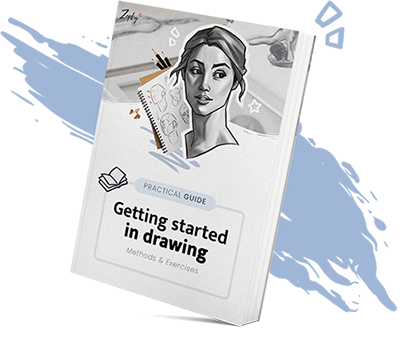
Discover our free guide to start drawing easily. You will learn practical methods and exercises to put into practice right away.
To master the art of drawing a portrait, it’s not enough to learn how to draw each detail. Knowing how to draw an eye, a nose, and a mouth individually won’t create a stunning portrait.
What truly helps us is understanding the fundamentals and seeing the portrait as a whole, rather than getting caught up in individual details.
1
We will always begin by drawing the structure of the head. The challenge here is to avoid getting fixated on the details and individual facial features. Instead, we want to learn how to draw the overall shape.
2
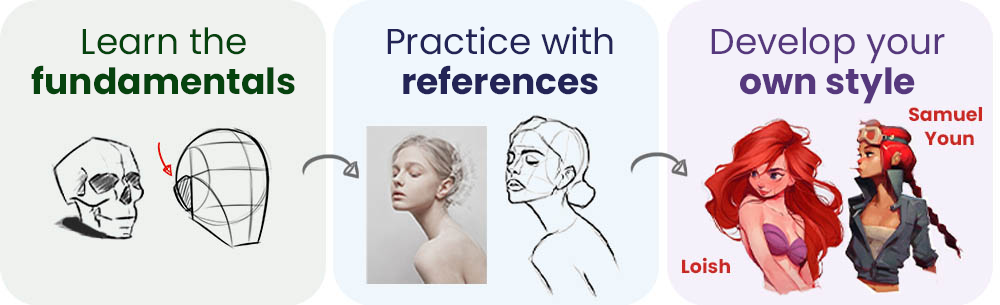
Once we learn to draw the structure, we can then add the facial features. Before attempting to draw portraits, it’s essential to practice using references.
3
Once we become comfortable with references and observational drawing, we can more easily develop our own style. The learning process is straightforward: we learn the basics, practice with references, and explore!
Imagine you want to learn to play a musical instrument. You would start by learning the notes, basic chords, and all the fundamentals.
Then, you would learn to play existing songs to understand rhythm, technique, and more.
Only after mastering all the rules would you be able to play with creativity and compose your own music. The same process applies to drawing.
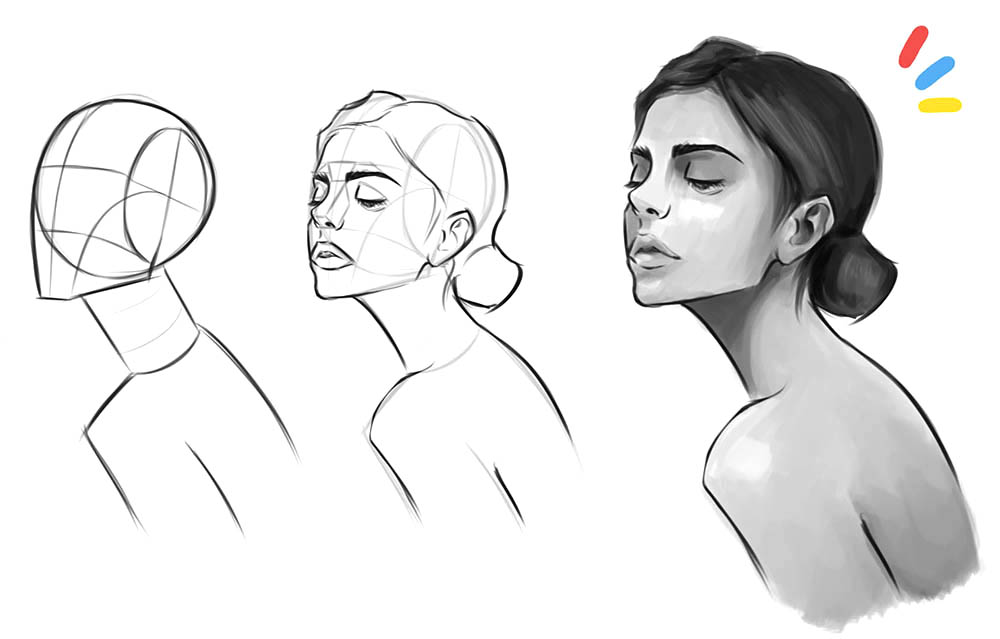
2 - Starting with the Head Structure
Drawing a face begins with understanding how to draw the head. The face doesn’t float on a flat surface; it sits on a real bony structure.
Our goal is to grasp the volumes that make up the skull to create a credible 3D foundation.
By constructing the head with simple volumes, you’ll be able to draw your portrait from any angle.
The idea is to assemble simple volumes together to reconstruct a more complex form. In the end, we are like sculptors, adding our volumes step by step, thinking in blocks.
🔸 Step 1 : The skull
The sphere is the most suitable shape to represent the cranial mass. It is simple to draw and allows you to envision the volume in 3D.
Simply start by drawing a circle.
If you are struggling to draw a perfect circle, your lines are shaky, or you don’t feel confident enough, take a look here: “Improving and Mastering Your Strokes”
To give a sense of perspective to our drawing, we will define the orientation of our sphere.
Draw a horizontal line that goes around your shape, and then a vertical line that cuts your sphere in half.
This way, the cross that forms in the middle of the sphere gives us an indication of the orientation of the character’s head. We can better understand which way the character will be looking.
🔸 Step 2 : The temples
The human skull is not entirely spherical; instead, it has several planes. The temples are located right where this change of plane occurs: transitioning from a frontal plane to a side plane.
To ensure that our structure serves as a consistent foundation for all types of faces, we will cut our sphere at the level of the temples to mark this change of plane.
Draw an oval to represent the temples and the side of the head. The size of the oval should be approximately 2/3 of the large circle.
🔸 Step 3 : The jaw
To complete the structure of the head, all that’s left is the jaw. Thanks to the previous steps, we can now draw it more easily.
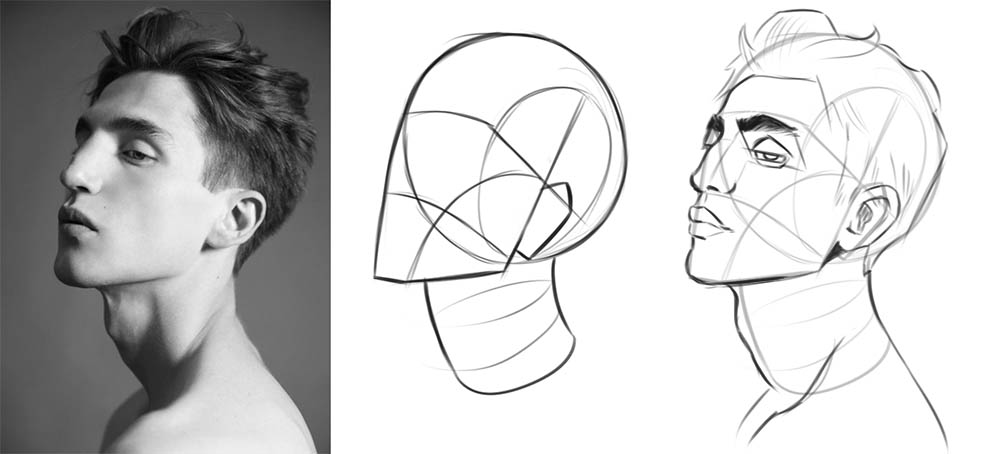
1
Thanks to the previously drawn oval, we can identify the positioning of the different facial elements.
By extending the top line of the oval, we get a reference for the hairline.
The middle line corresponds to the eyebrows.
The last line of the oval gives us the base of the nose.
By applying the same distance, we can identify the location of the chin.
2
By extending the vertical line of the oval downwards, we obtain the jawline. All that’s left is to connect the two lines at the chin.
3
Then, we draw a curve from the center of the oval to the chin.
⚠️ Don’t forget to draw the vertical line to define the center of the head. It will always help you better position the facial elements in perspective.
To summarize the process:
Start by drawing a sphere, then define the angle of the head.
Cut the sides of the sphere at the temple level by drawing an oval. This will be the side of the head.
Draw the jaw using the method of thirds. Your structure is ready!
3 - Drawing the Head from Imagination and in Any Angle
Now that we have a better understanding of how to draw the head, we can practice drawing it from various angles.
The first step is to decide whether we are seeing the head from above or below. To better understand this, we will use a simple shape: the cube.
Next, we need to determine whether we are looking at the head from the left side or the right side. By practicing drawing the head from all angles, it will become much easier to draw portraits from imagination.
4 - Facial Proportions and Features
Now that we have covered the structure of the head, let’s learn how to position the facial features in a drawing.
We have already seen how to position the hair, eyebrows, bottom of the nose, and chin.
Thanks to this method, we can now position any facial feature using simple guidelines.
🔸 Step 1 : The ears
Start by positioning the ears. They are located in the lower back corner of the oval.
With our guidelines already in place, it becomes super easy to position our various facial features!
🔸 Step 2 : The eyes
The eyes are actually deeply set into the face. The eye sockets create a hollow, adding a lot of depth.
To draw a face with depth, we will create an inclined plane.
The two eye sockets are separated by the bony structure of the skull, which has the shape of a small hourglass.
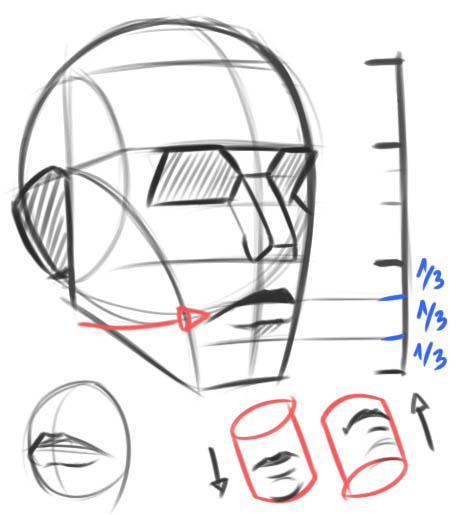
🔸 Step 3 : The nose
Since we already have our reference point for where the bottom of the nose is located, we can draw it with the correct proportions.
Start by simplifying its shape into a cubic volume, like a box. The goal is to always start with the simplest forms before delving into the details.
🔸 Step 4 : The mouth
We will divide the last third into three equal parts (from the bottom of the nose to the chin). The first line will help us position the middle of the lips, and the second line will be the top of the chin.
The area of the mouth is unique; it is curved. Therefore, it is not flat but more like a sphere or a cylinder.
And there you have it! We have now seen how to construct the head and position each facial feature! By mastering these essential foundations, you can then delve into every detail as much as you desire. No more floating faces and inaccurate proportions.
Each page guides you through short, at-home lessons on how to draw realistic faces. It has a lot of step-by-step guides, ideal for getting started in drawing.
From basic facial structures to finer details, the book teaches you the fundamentals of portraiture, and also allows you space to practise on the page.
To conclude
We have covered the basics of learning how to draw a face. With practice, you will be able to draw the head from all angles and position any facial feature with ease.
Drawing the structure of the head is truly the first step in creating a portrait. There’s no need to master drawing an eye before being able to easily draw the head.
Just like the foundation of a drawing, its skeleton, a solid and believable result is achieved by focusing on the basics of volume. So, remember to develop your skills in this area! ✍️
Save the article for future reference!
By hovering over the image, you can directly save the article to your Pinterest account. This also allows us to share the article with a wider audience of aspiring artists!
Good evening,
Thank you for all your valuable advice. I will practice on the skull instead of the mouth or the eye. You are absolutely right. Thank you very much.
Hello, thank you so much for your feedback. ☺️ The Pinterest links have been updated, everything is fine now. Thanks for bringing this little issue to my attention, and happy learning to you! ✨
Honestly, I don’t know how to thank you. Thanks to you, I will be able to draw my characters and improve more and more. Do you have any lessons on drawing the body or other details, please? 😵
Thank you so much.
With great pleasure, if it can help you, then that’s perfect! ✨
I offer a course to master the basics of drawing which includes drawing the human body and everything you need to know to better understand anatomy.
In parallel, more content is coming to the blog!
Hello,
I am a big fan of your drawings, but especially of the educational aspect that you emphasize, which is close to my heart. As a Physical Education teacher, I would like to draw inspiration from the face of the young man you illustrate in point 1 for a project. I wanted to know if you authorize me to use your sketch, which exactly matches what I am looking for.
Congratulations again for this website.
Best regards
Ok, thank you! 😊
In any case, congratulations, the site is extraordinary, in just 3 days, I have already made a lot of progress 😍😍
The explanations are very clear!
Hi Zephy… great course, I have really learned a lot thanks to you! It’s just a shame that there are no corrected exercise sheets! Will there be some soon? Otherwise, I love your courses, thanks again
I’m glad you enjoy the tutorials and courses! ✏️ Corrected exercise sheets will be coming soon, it would indeed be a good bonus to help you self-assess. Thank you!
To provide the best experiences, we use technologies such as cookies to store and/or access information on devices. Consenting to these technologies will allow us to process data such as browsing behavior or unique IDs on this site. Not consenting or withdrawing consent may have a negative impact on certain features and functions.
Functional
Always active
Storage or technical access is strictly necessary for the legitimate interest of enabling the use of a specific service explicitly requested by the subscriber or user, or for the sole purpose of transmitting a communication over an electronic communications network.
Preferences
The technical storage or access is necessary for the legitimate purpose of storing preferences that are not requested by the subscriber or user.
Statistics
The technical storage or access that is used exclusively for statistical purposes.Storage or technical access that is used exclusively for anonymous statistical purposes. In the absence of a subpoena, voluntary compliance by your Internet service provider, or additional records from a third party, the information stored or accessed for this sole purpose generally cannot be used to identify you.
Marketing
Storage or technical access is necessary to create user profiles for sending advertisements or to track the user on a website or across multiple websites with similar marketing purposes.


28 comments
Wow, I didn’t know you had to cut the sphere of the head at the temples 😮 😮 😮 ! I’m going to try, boss!
These kinds of little details help improve drawing, it’s awesome that you discovered this technique! Practice well. ☺️
It has been of crucial importance to me. Thank you!
You’re very welcome, Ulrich. I’m glad it could help you!
Good evening,
Thank you for all your valuable advice. I will practice on the skull instead of the mouth or the eye. You are absolutely right. Thank you very much.
Good evening Nadia,
You’re welcome! The rest will come much more easily once the head is well constructed. ✨
Great zephy
Thank you Clémence! ☀️
Hello, your explanations are great! But your Pinterest boards are no longer accessible, do you know why? thank you
Hello, thank you so much for your feedback. ☺️ The Pinterest links have been updated, everything is fine now. Thanks for bringing this little issue to my attention, and happy learning to you! ✨
Muchas gracias por tu tiempo
You’re so welcome ☺️
Honestly, I don’t know how to thank you. Thanks to you, I will be able to draw my characters and improve more and more. Do you have any lessons on drawing the body or other details, please? 😵
Thank you so much.
With great pleasure, if it can help you, then that’s perfect! ✨
I offer a course to master the basics of drawing which includes drawing the human body and everything you need to know to better understand anatomy.
In parallel, more content is coming to the blog!
Awesome! The drawings, the explanations, etc 🙂
So happy it can help!
Great! Thank you for this very informative article
With pleasure!
Hello,
I am a big fan of your drawings, but especially of the educational aspect that you emphasize, which is close to my heart. As a Physical Education teacher, I would like to draw inspiration from the face of the young man you illustrate in point 1 for a project. I wanted to know if you authorize me to use your sketch, which exactly matches what I am looking for.
Congratulations again for this website.
Best regards
Hello Regis,
Of course, feel free to use this sketch for your project. 😊
Thank you very much for your feedback!
Great article thanks for the tuto
Always a pleasure! ✨
Hi there!
Thank you for this well-explained article! I didn’t realize that drawing was actually so complex.
Hello, are there any corrections for the exercises?
Anyway, great website, I’ve been fully engaged since yesterday!
Hello Nina, glad you’re enjoying the content. I haven’t added corrected sheets yet, but they will be available soon.
Happy drawing! 😊
Ok, thank you! 😊
In any case, congratulations, the site is extraordinary, in just 3 days, I have already made a lot of progress 😍😍
The explanations are very clear!
Hi Zephy… great course, I have really learned a lot thanks to you! It’s just a shame that there are no corrected exercise sheets! Will there be some soon? Otherwise, I love your courses, thanks again
I’m glad you enjoy the tutorials and courses! ✏️ Corrected exercise sheets will be coming soon, it would indeed be a good bonus to help you self-assess. Thank you!