
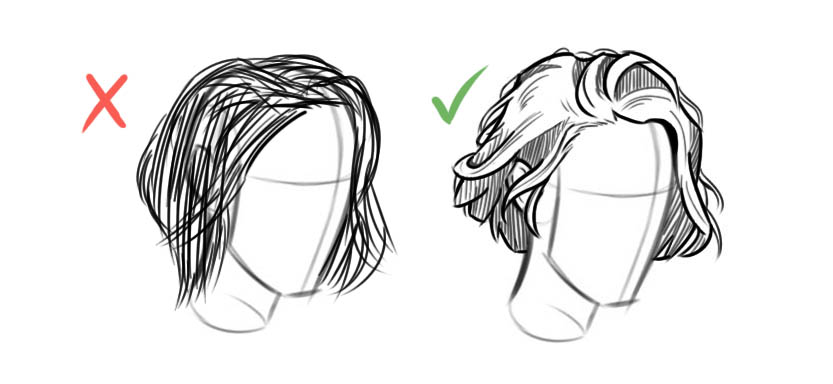
Drawing hair can be quite easy when you know the steps to follow. Usually, we want to start directly with the end: the details. And that’s often why we end up with flat drawings and hair that looks like spaghetti.
But to learn how to draw hair, we need to take the time to break down the drawing process step by step.
Together, we will discover how to draw hair properly to achieve a realistic result, and by the end of the article, you will already know how to easily draw hair.
Discover our free guide to start drawing easily. You will learn practical methods and exercises to put into practice right away.
1 - Think of hair as a single volume
When starting out, we tend to draw hair strand by strand, making hundreds of strokes with our pencil.
Unfortunately, the result is far from great, and we end up with a sort of scribble and a cluster of lines stuck to the head of our character. Moreover, it takes us a lot of time to draw.
It’s important to understand that drawing is approached in the same way as sculpture. In drawing, we try to represent a 3D element on a 2D surface.
The idea is to think in terms of mass, volume, as if we were sculpting our forms with our pencil.
In sculpture, we don’t attach hair strand by strand to our clay block. That would be too time-consuming for a mediocre result. Instead, we first define the overall mass of the hair.
In drawing, it’s the same process. We approach the hair as a single mass, composed of multiple volumes, rather than drawing it with individual strokes connected to one another.
Think of a global 3D shape that has weight and is also governed by gravity. Regardless of the type of hair you want to draw, whether it’s curly, wavy, or straight, the idea is to think in terms of volume.
Now that this important reminder is established, we can proceed to define our steps for drawing hair quickly and achieving a credible and realistic result.
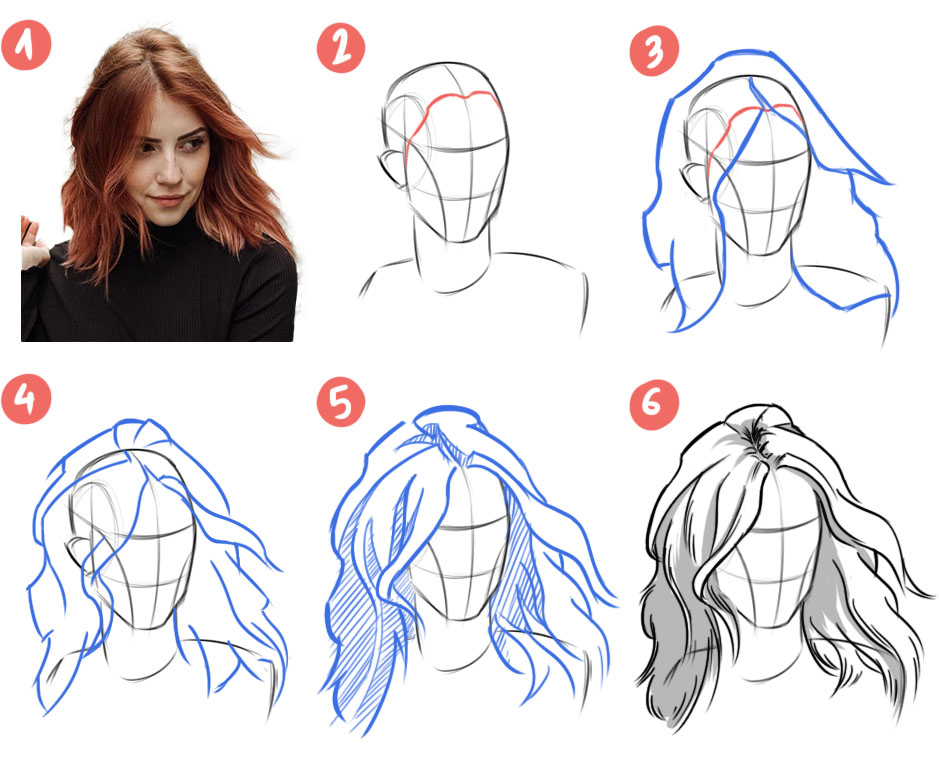
2 - Start with the hair roots
First and foremost, it is important to draw the character’s head without hair and define the skull properly. This will help us better understand how to position the mass of hair, as it follows the shape of the head.
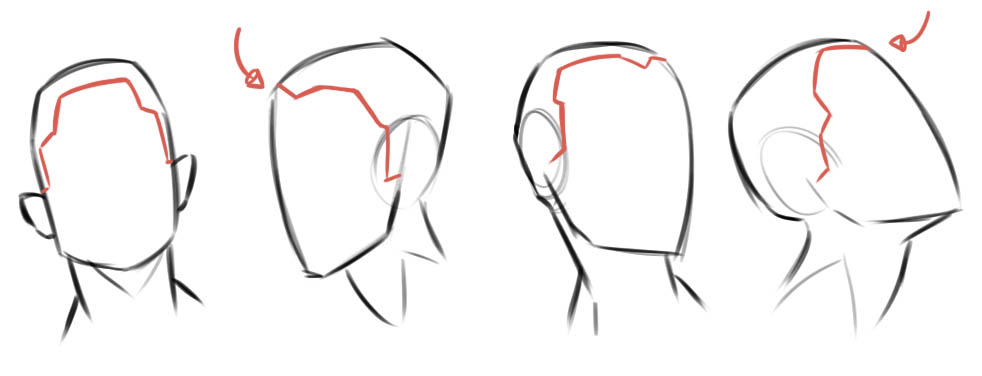
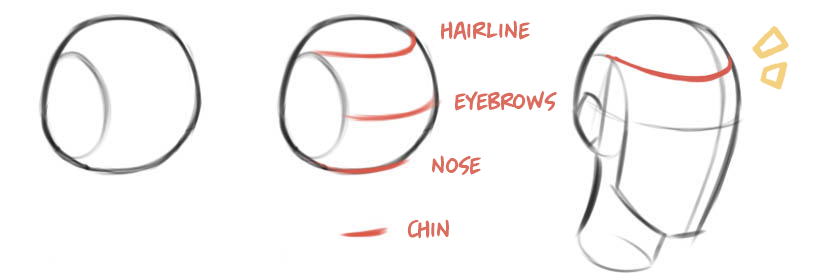
Once we have our head sketch, we can start drawing the hair by first focusing on the hairline. It is the line that separates the forehead from the hair, and it varies from person to person.
How to find the hairline?
Using the rule of thirds, we can easily find our proportions and determine where to place the hairline. Of course, these are just basic proportions. Depending on individuals, this line may vary, being higher or lower, for example.

You can take a look at the article on head structure if this method is unfamiliar to you. You’ll see, it’s incredibly useful for drawing the head from any angle with the correct proportions.
Tips for creating realism
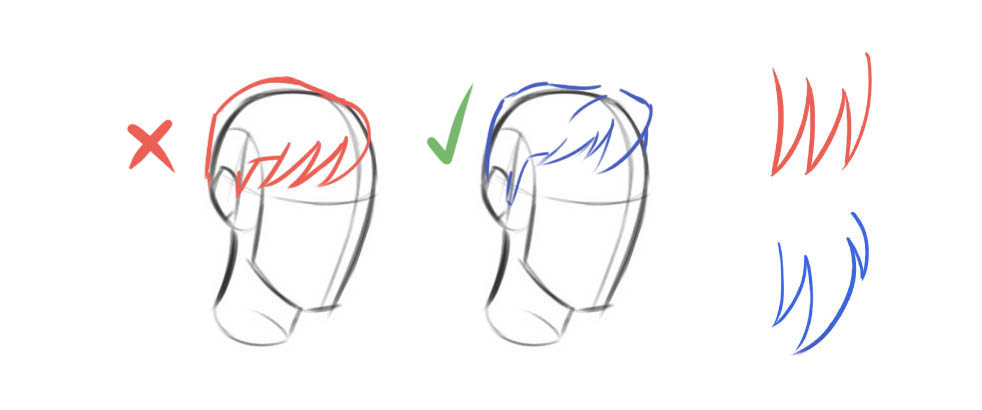
Remember that the head is not perfectly spherical but has flattened sides. The transition occurs at the temples, where the frontal plane changes to a side plane.
As a result, the hairline will not be perfectly rounded but will follow this change in plane.
The helpful tip is to use the temples and eye sockets as a guide to determine where the hairline passes. It’s as if our hairline follows the same inclination as the eyes.
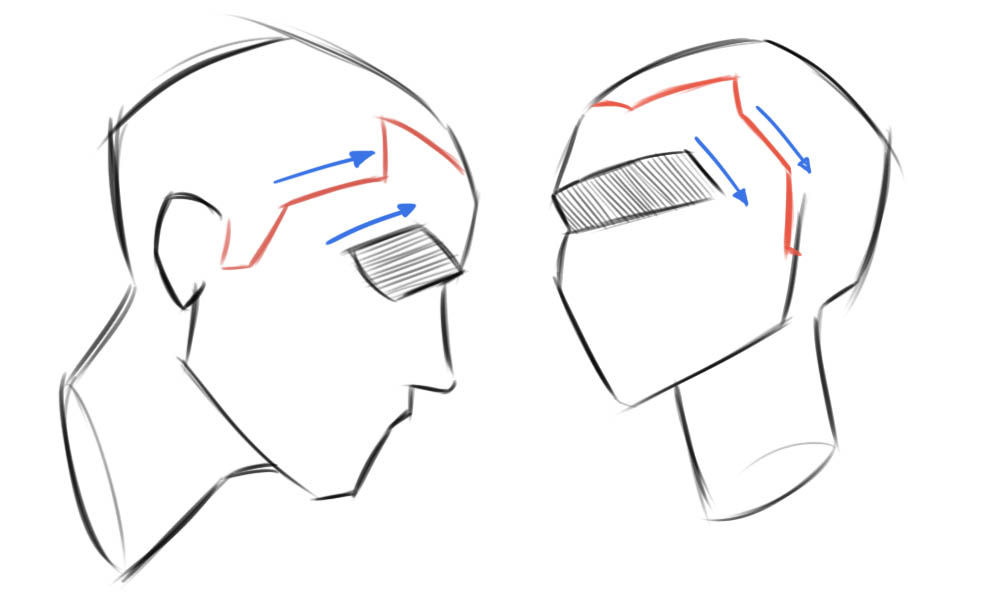
For the top of the skull, you can have fun with different designs. You can play with a “V” shape that descends onto the forehead or, conversely, maintain a highly rounded line.
The trick is to create irregularity and variety to generate interest. A perfectly rounded line would result in a somewhat boring design.
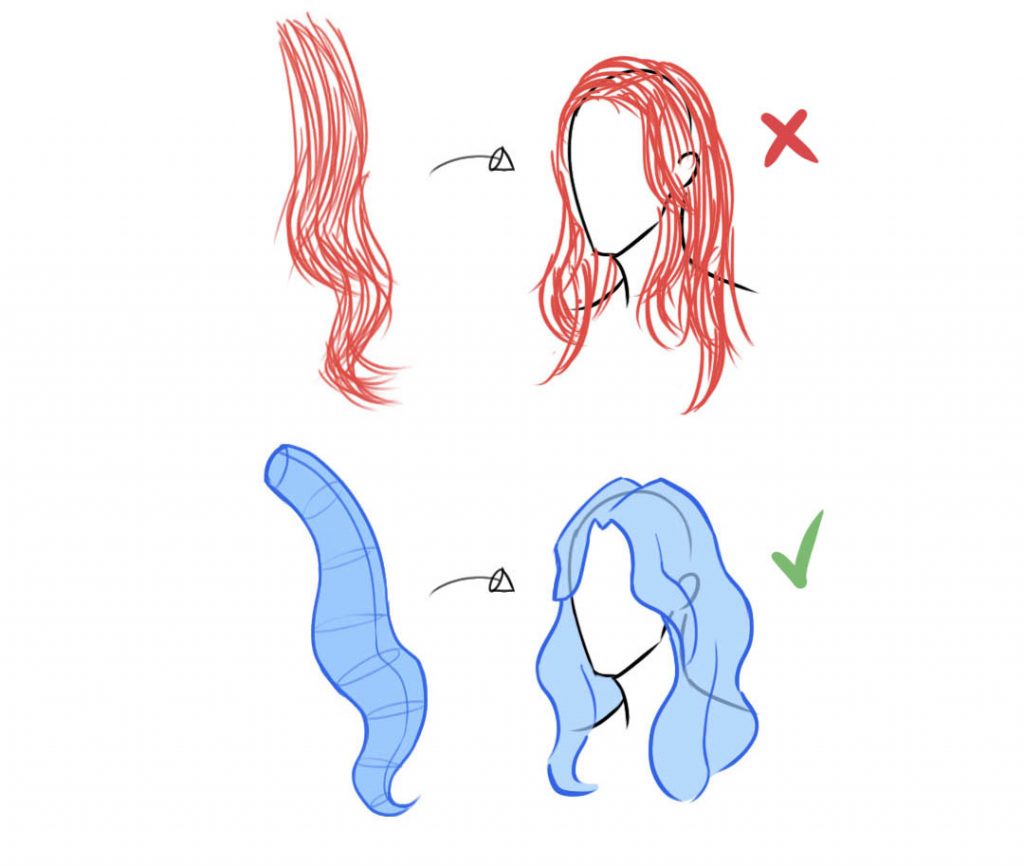
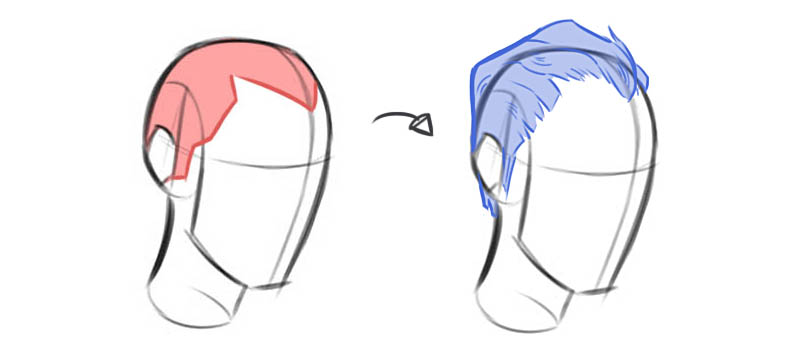
3 - Find the overall shape of the hair
Now that we have determined where the hair will originate from, we will create an overall shape to define our hair drawing.
You already know how much I love using references, so my advice is, of course, to gather several references before starting your drawing.
Why do we need a reference?
By drawing inspiration from photographs, you will build a visual library that your memory will store securely. Over time, you will be able to draw from memory a wide range of different and unique hairstyles!

Even with a reference, the idea is not to simply copy what we see, but to take ownership of the shape and movement of the hair.
We want to enhance what we see to give character to our drawing and add a real interest, a sort of added value.
Start by drawing the overall shape of your hair mass without getting into the details. Define a thickness and a silhouette for this shape. Then, restart by exaggerating the volume.
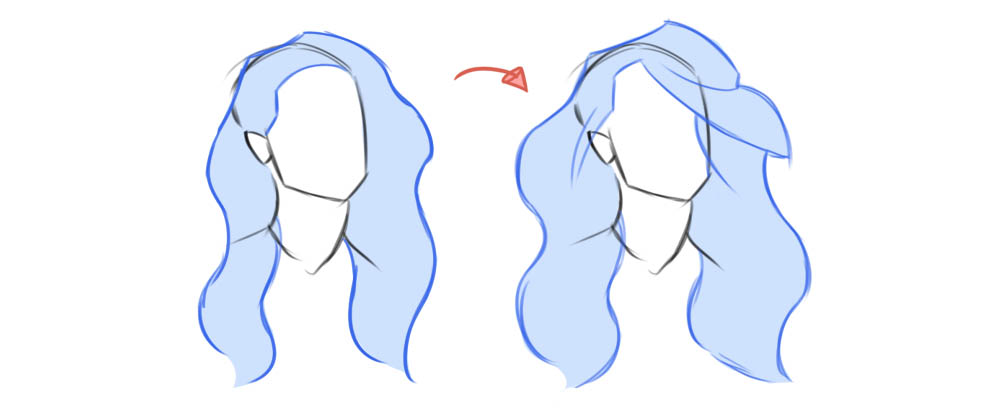
Stay logical and consider gravity
If we think of our hair as a single mass, it becomes easier to create high-quality designs. Take a close look at your references to understand how the hair mass behaves.
It is rare to have hair naturally standing upright or going in all directions (unless intentionally aiming for a manga style, for example).
The idea is to first learn how to create realistic designs and then experiment with various styles until you find your own.
In the meantime, continue to learn by observing and staying logical when drawing hair.
The fundamental rules of composition
“To draw hair and find a suitable design, we need to remember the essential rules of composition that will make our lives easier. These rules apply to anything, in fact.
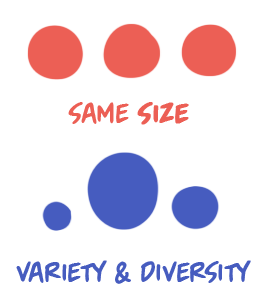
To create diversity in a drawing, the trick is to play with the size of elements.
When aiming to draw something, we can easily create dynamism by following the rule of large, medium, and small.
Instead of keeping your elements at the same size, draw one element that is small, another that is medium, and a third one that is large. And voila, you end up with a much more dynamic composition!
This trick applies to everything, including drawing hair. We aim to create an interesting hair shape, and for that, we can play with the size of the strands.
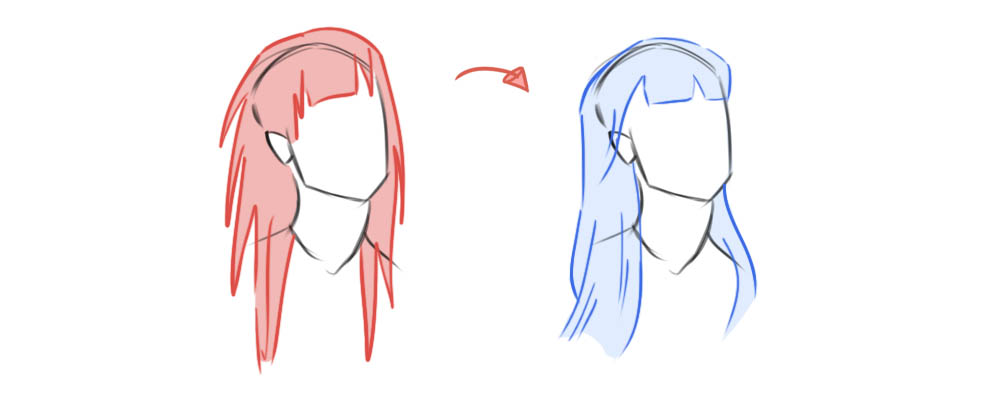
4 - Define strands
Once the overall shape of the hair is defined, we will separate it into several strands to add volume and depth.

Imagine each strand as a thick ribbon that starts from the top of the skull, the sides, or the back of the head. Without getting into the details, simply define the movement of a few main strands.
This will allow us to move into volume and apply our composition rules. With the composition rule we discussed, create strands of different sizes to add dynamism!
By creating new strands, you can break the outline you have created to match the movement of the strands. In the end, thanks to the strands, we define an even more precise and refined mass.
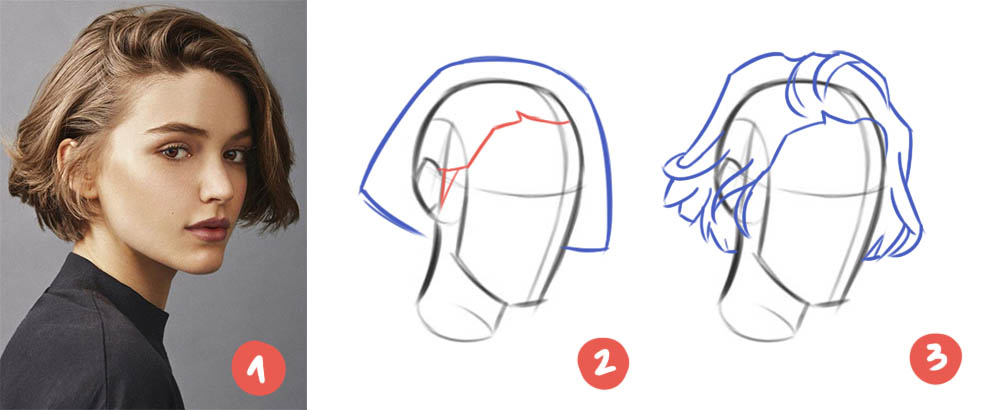
1
We choose a reference to practice with.
2
We define the hairline and simplify the overall shape of the hair by giving it volume.
3
We break the outline by defining the main strands. Here, we focused on the top of the skull and the movement of the hair towards the ends.
Use overlapping to create depth. We want our strands to pass in front of each other, creating a real sense of volume.
By creating groups of thick strands and allowing them to overlap, we are able to achieve volume.
5 - Apply the areas of shadow and light
Once we have drawn the hair and the main strands, we can apply the shadows and highlights.
First and foremost, it is essential to learn how to apply shadows and highlights on basic shapes. The process is the same, whether it’s on hair or a simple sphere.
We first determine the direction of our light source. Then, we define our main shadow area. We don’t go into the details yet, we simply separate our shadows and highlights into two areas.
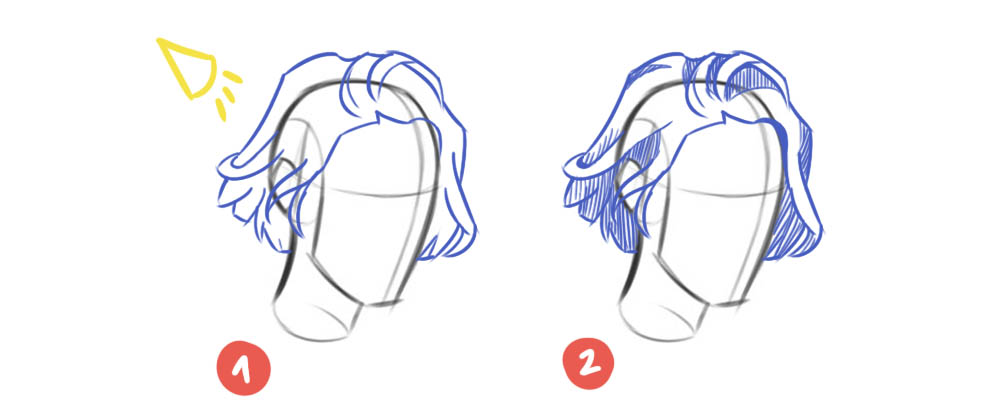
1
First, we determine the direction from which our light is coming. Think about the direction it takes. Is it coming from the top right? Top left? Give it a direction.
2
Next, we will define our main shadow area. We don’t go into the details yet, we simply separate our shadows and highlights into two areas.
By keeping it simple, we can actually streamline the process and achieve a much better result.
Imagine that the strands of hair you are drawing have different planes. Which plane will be facing the light? And which one will be facing the shadow?
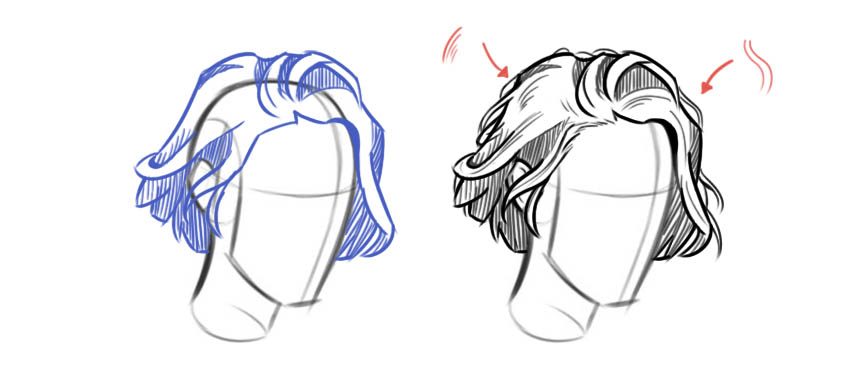
6 - Add texture and detail to your drawing
One tip to remember is not to add detail everywhere! By defining every single hair, you end up with too much texture, too many details, which can disrupt the overall harmony of the drawing.
To achieve a balanced composition, try not to add more than two-thirds of detail and leave empty spaces to let the drawing breathe.
To add detail, you can further break the outline by adding small strands that protrude from the mass of hair. You can also define individual hairs within the strands.
Use different strokes. If your lines are all the same, parallel, and evenly spaced, the composition can become dull. However, by introducing variety, your lines will create the illusion of detail and texture.
The techniques of lines
1

The first tip to create variety in your lines is to group them in sets of 3. By making combos of 3 lines, you create an illusion of texture that works quite well.
2

The second tip is to vary the thickness of your lines. We’ve already discussed this in the article ‘Improving and Mastering Your Line’, but thickness can make your drawing much more impactful.
3

The third tip is to leave open spaces between your lines. This creates asymmetry and irregularity, which is more visually appealing and adds interest to your hair drawing.
4

The final tip is to consider the lighting when adding details. Where the light hits your hair, the texture will be finer, or even non-existent. Therefore, leave empty areas in your drawing where the light directly touches the hair.
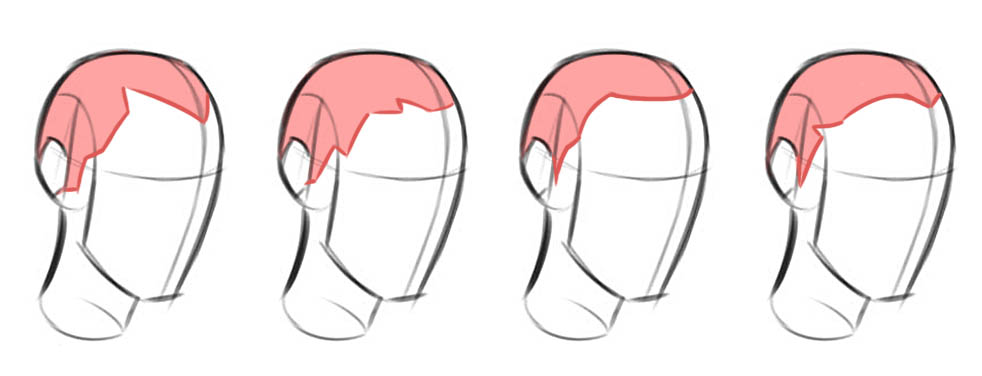
Break the hairline
We defined our hairline in the first step. To make it more realistic, the idea is to break it into several sections!
To avoid the wig effect, we’re going to create a transition between the forehead and the hairline, so that we can feel that the hair is attached to the scalp and have a believable overall look.
For this, we will simply use a few strokes that extend from the scalp to the hair.
And there you have it! In just a few steps, and by deconstructing our drawing process, we can achieve a great result quickly. The key is not to start with the details, but to trust the process.
Our selected book for inspiration
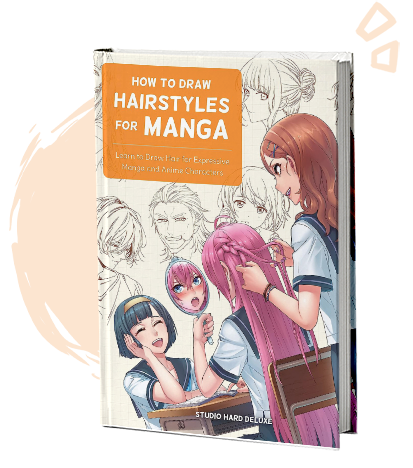
This book is a great guide to expand your visual library and study a ton of references to apply to your characters!
To summarize
Drawing hair requires patience and practice, but the process is super easy to integrate.
By taking the time to go through your drawing step by step, you give yourself the opportunity to think and observe. This automatically leads to better results.
By exaggerating the shapes, you can more easily draw in volumes, and by moving from larger (the overall form) to smaller (the details), you make progress.
Keep practicing so that all the steps become seamless, and you’ll see that drawing hair becomes a true joy. ✍️

Save the article for future reference!
By hovering over the image, you can directly save the article to your Pinterest account. This also allows us to share the article with a wider audience of aspiring artists!
3 comments
Thank you, the explanations are very clear. I just need to practice to see the results. It’s true that I would like to draw portraits, but it’s challenging! Drawing, in general, is difficult. Every detail matters in drawing! One small mistake, and everything can go wrong. The challenge is knowing how to correct mistakes, and that’s not easy!
Thank you for your message, Rogère! Learning is certainly not easy, but it can be simplified. Remember that mistakes are not a bad thing, on the contrary, each small mistake allows you to improve and do better in the next drawing. The key is to let go of perfectionism, which can often hinder our progress when drawing. At the beginning, it’s unfortunately what holds us back in our improvement. Correcting our own mistakes can indeed be quite challenging. I will create a comprehensive article on this topic to help you. ☀️
Thankyou so much, it will help me for my practice. I really liked the process of breaking down the Messy thing into Simplified. I will Give a try now. Thank you.